If there is a child in the house, then there must be at least one puzzle in it.
Such an interesting and exciting game is to assemble a whole beautiful picture from small pieces. However, these tiny figurative pieces tend to get lost, and then the game ends. Do not rush to throw the remains of the puzzle into the trash. They have many interesting uses!
The remains of puzzles make unusual pictures - try using them to put a flower, butterfly or other figure on cardboard. It doesn’t matter that the fragments have different colors and patterns, it will still be very beautiful.
You can use puzzles to update the hard cover of a book, notepad, the outer walls of a pencil cup, plastic flower pots, or make a table rug.
Old puzzles make wonderful bookmarks, construct convenient tracks for racing small cars, and create unusual wall decoration in a dollhouse.
From puzzles you can assemble an abacus on a wire, beads on a thread, and also a picture from hanging multi-level ribbons.
If you stick a pin to the puzzle, an icon will come out.
And from the surviving puzzle fragments, unusual handmade postcards are made. All you need is to select a puzzle piece that matches the theme and glue it to thick paper folded in the shape of a postcard. And then write your wishes.
An excellent gift can be made from the following materials:
Remains of puzzles;
Acrylic paints of different colors;
Paint brushes;
Glue;
Cardboard vertical photo frame (you can make it yourself from thick paper to fit the size of the future photo).
Sequencing:
1. Take the puzzles, turn them over and paint them with different colors of paint.
2. Place dots along the edges of each painted piece with a thin brush, which has been previously dipped into white paint. You will get a polka dot effect.
3. Allow time for the paint to dry.
Tips: You don’t have to color the puzzles, but choose multi-colored pieces and glue them like that. Or glue some fragments and then cover them with pearlescent varnish. It is better to place puzzles that are glued separately, offset on top of each other. This overlap will give the frame a voluminous appearance. And it’s not at all necessary to straighten the edges of the frame, cutting off the unevenness of the puzzles, because that’s the beauty of it.

If you want to get a smooth edge, pick up those puzzle pieces that should have been located along the edges of the puzzle.
Fantasize yourself, involve your kids in this activity. They are such inventors! Create a whole gallery of gifts that will delight your loved ones, family and friends.
There are a lot of them being made now, they are soft, it’s great to play with them in the bath, they are so creative... Yes, everything is great! But few people know that such puzzles have many other uses.
I’ll make a reservation - for our purposes we need a fairly thick puzzle, at least 1 centimeter thick. I once bought a set like this, tried to build with it, and it turned out to be a wonderfully soft and large cube. I wanted more - and I bought several more sets. Then, unfortunately, they stopped selling them; I couldn’t find them online either, otherwise I would probably have bought the whole lot. Their scope of application turned out to be very wide.
So if anyone recognizes our puzzles, please let me know. The children have grown up, but the puzzles can still be used.
So, twenty ways to use soft puzzles (subject to the purchase of several sets, we have 30 squares):
1. exactly as it was intended - like a puzzle.
2. another standard application - you can make a soft mat - it is large and warm, it is convenient to play on a cold floor
3. you can find identical drawings, sort puzzles by color and assemble figures of the same color from them 
4. Having put cubes out of them, you can use them as chests - and here, too, there are a lot of options for use: “pirate chest”, “find where the toy is hidden”, etc.

5. the cubes themselves - they are large, light, bright. You can use cubes to build a wall, a tower, etc.
6. if you build carefully, you can simply build a huge tower - for children its height is simply amazing 
7. the same tower easily turns into a slide-tunnel along which cars are driven 
8. cubes without one side - houses, garages, etc. You can also make windows, doors, etc. there. 
9. you can build one large garage with several driveways and tunnels 
10. You can make a path out of squares - cars can race along it, but it’s best when the children themselves race, they love it. You can put obstacles on the road, all from the same squares folded into a house, make gaps 
11. You can take a long journey through the swamp, using the puzzle squares as “bumps”. Children can throw them in front of them and jump from bump to bump. You can come up with a whole quest, come somewhere, get treasure, fight the villain and come back. And all without leaving the room 😉 
12. You can build a bridge - cars will drive through it, dolls will pass through and the children themselves will crawl through - just be very careful, otherwise it can be broken. Children like it 
13. turning the bridge over, we get the first version of the fortress, with towers 
14. You can build a fortress wall, what’s inside is at your discretion
15. The same principle is used to build a “crib”, “boat”, etc. 
16. You can build a tunnel through which cars can race, or the children themselves can race. 
17. You can build a big labyrinth if you make only walls, without a floor - it’s so fragile, but the labyrinth will come out big
18. You can build a high chair (if you make the seat longer, it will be a crib) for dolls. With some care, children can sit there themselves. And when they press a hole in the middle, announce that you have made a pot - a sea of joy is guaranteed! 
19. Squares simply stacked on top of each other and fastened together can form a ladder or a log for walking. 
20. You can build a wall. Children love to hide behind it. It's not very durable, but that's all the more fun. You can have a little war with two boys by building two lower walls 
I always wanted to tell manufacturers about all these game options - let them include descriptions of the game options in their toys. But you can tell us too - let as many mothers as possible know that such puzzles are just a treasure
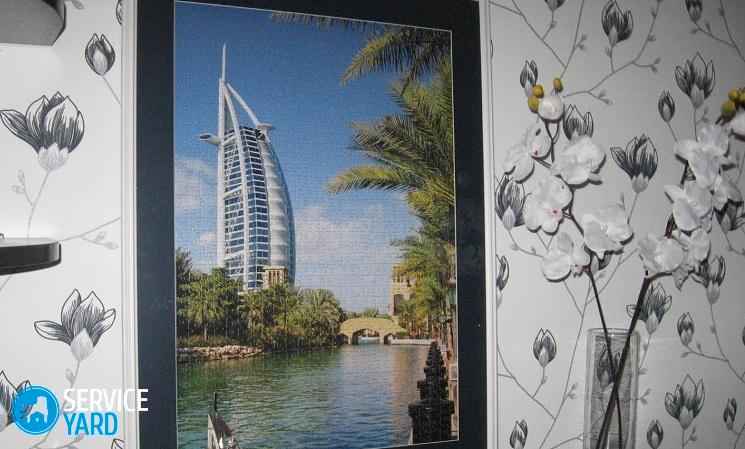
Many children and adults love to put together puzzles. This activity develops children's imagination, horizons, logic and fine motor skills. It is not surprising that the popularity of such entertainment is growing every day. A puzzle is an intrigue, a mystery that you want to solve, which is why many adults are happy to purchase puzzles and put them together with their children. But after assembling the puzzle, the question arises: what to do with it next? It can be disassembled or glued together and made into a real picture. For example, if they depict paintings, then DIY puzzle paintings can decorate any modern interior. Children love to collect pictures with their favorite cartoon characters, so putting it in the form of a picture is very interesting. But how to attach puzzles to a picture? To ensure that the gluing of puzzles is successful and you don’t have to throw the painstakingly assembled picture into the trash, you need to know some nuances. So, how to make a picture from puzzles into a frame?
Methods for gluing a puzzle
First of all, it is necessary to solve the question of how to fix the puzzles into a picture so that they do not fall apart, how to preserve the craft? The easiest option is to glue them together. How to glue puzzles into a picture with glue at home?
Gluing the puzzle from the front side
You can glue the puzzles together on the front side using glue or tape. Before starting the gluing process, it is necessary to clean the painting from dust, hair and other contaminants.
Important! To avoid staining the table with glue, place tracing paper or baking paper underneath.
Gluing the puzzle from the wrong side
If you don't want to apply glue to the front side, you can glue it from the back. But here the question arises, how to turn the puzzle face down. For this:
- If you plan to glue a puzzle in this way, then you will initially need to assemble it on an easily movable surface. This can be a sheet of fiberboard, plexiglass or a special mat for puzzles. In this case, you will have less problems with turning the puzzle over - just cover the top of the assembled mosaic with a durable material, for example, another sheet of fiberboard, and with a quick movement turn the entire structure over to the other side.
Important! If your painting is very large, then you can additionally secure the structure with tape or office clips.
- You can use cling film. In this case, you need to assemble the mosaic on a substrate, which should be slightly larger in size than the puzzle itself when assembled. When the puzzle is assembled, wrap the entire picture along with the backing with cling film. To be sure, you can make several layers of cling film. Then you need to carefully turn the entire structure over, place it face down, and cut the cling film along the backing. Turn the edges of the film to the side and carefully remove the backing. Now you can glue the puzzles, and the cling film will protect the table from glue.
- If the mosaic was assembled on a table or on the floor, you need to carefully move the finished pattern onto a dense surface.
- The most optimal way, especially for large paintings, is to glue first from the front side, and then from the back side. First, coat the front side with glue and wait until it dries completely. Now turning the mosaic over will not be difficult. Turn over carefully and coat the wrong side with glue.
Base for gluing the puzzle
What do you glue puzzles onto to make a picture? The following materials can be used as a base.
Fiberboard sheet
It must be cut exactly to the size of the picture. Trimming the edges after the puzzle has been glued may damage the puzzle.
- Apply PVA glue in a thin layer so that there are no dry spots left.
- Excess glue must be removed immediately so that it does not leak onto the front side.
- Place the glued sheet on the inner surface of the assembled puzzle, press down and immediately turn it face up.
- The glue that appears after pressing must be removed with a clean cloth.
- Leave until completely dry.
Important! Such sheets are optimal for creating large paintings; their surface is smooth, the puzzle is easy to glue, and does not lose its appearance over time and does not deteriorate. But along with the advantages, there are also disadvantages: these sheets need to be cut with special tools, in addition, the picture turns out to be quite heavy and requires special fastenings.
Styrofoam
A good alternative to fiberboard can be thin polystyrene foam, which can be purchased at hardware stores. This is a lightweight material, which is also easy to cut and convenient to use. It is not deformed by the glue and does not become distorted after it dries, since it is about 15 mm thick. But such a thickness is rather a disadvantage, since to frame a picture you will have to look for a fairly massive structure that will hide such a thickness.
Ceiling tiles
These tiles come in different thicknesses and sizes. They are easy to cut, fit into standard frames in thickness and are quite affordable:
- For the base, you need to choose a tile without a relief pattern, about 4 mm thick.
- One tile holds a puzzle consisting of 500 pieces.
- If you have a large pattern, you can glue several tiles together with PVA glue.
- It is best to make the joints between the tiles jagged.
- The puzzle is glued to the back of the tile.
- After gluing, you need to remove excess glue and put the picture under pressure. You can simply put a board on top. If this is not done, the structure may become deformed as the glue dries.
Gauze, tulle
It can be done very simply:
- Apply glue to a regular piece of gauze or tulle of a suitable size and attach it to the mosaic.
- Excess glue must be removed immediately with a rag or napkin.
- After the glue has dried, you can apply another layer on top to secure the result.
- The remaining edges of the gauze can be trimmed or used to stretch it over a frame or other surface.
Adhesive or self-adhesive film
It is sold in rolls of different widths. The surface must be dry and clean without dust. The size of the film should be a couple of millimeters smaller than the size of the mosaic.
- Cut the required piece of film.
- Separate the paper from the film by about 5 cm.
- Apply the self-adhesive film to the surface and glue the separated edge.
- Then slowly and carefully pull the paper away from the remaining part.
- You need to smooth the film with your other hand. You can use a towel, you can do it with your hands - whatever suits you.
Important! To avoid bubbles, iron from the center to the edges. If bubbles do appear, pierce them with a needle.
How can you glue puzzles?
Now you need to figure out what to glue the puzzles on to make a picture.
PVA
PVA glue is used for gluing products made of wood, paper, cardboard, glass, leather, fabrics, etc. It is also perfect for gluing puzzles. It dries quickly and becomes transparent after drying, so don't be fooled by the white glue stains - they will soon disappear.
Important! Suitable for both back and front sides.
Step Puzzle
This is a special glue for gluing puzzles. It is often included in the kit. It is distributed over the entire surface with a piece of foam rubber or a brush.

Powder glue from Clementini
This is glue from Italian puzzle manufacturers, which, as a rule, comes complete with the puzzles themselves. It must be diluted in water in a ratio of 1 to 3. The glue is quickly absorbed and, when diluted correctly, leaves no traces.
Silicate office glue
Even though it is not intended for such purposes, it nevertheless does an excellent job and gives the picture a glossy shine.
Scotch
Regular adhesive tape has become very popular among puzzle lovers. They can easily glue the wrong side together. First glue your picture vertically, then horizontally.
What can frames be made from?
There are many ways to make a picture frame from puzzles:
- The easiest way is to buy a ready-made frame of the appropriate size.
- A simple but very cute frame can be made from unsharpened colored pencils. In this case, the base for the picture should be larger than the drawing itself. Colored pencils of the required size are glued to the edges. They can be glued with Moment glue.
- A beautiful frame will be made from the ceiling plinth. You need to cut it with a stationery knife and glue it to the base around the perimeter of the picture using “Moment” glue or “Liquid nails”. Then you can paint your frame with acrylic paints.
- You can make a frame from a shoebox, but the frame is limited by the size of the box. Cut a hole in the bottom of the box that matches the size of the puzzle. The mosaic itself needs to be glued onto the lid of the box, put the lid into the box, and the frame is ready. You can decorate it as desired or simply paint it with paints.
If there is a child in the house, then there must be at least one puzzle in it. Such an interesting and exciting game is to assemble a whole beautiful picture from small pieces. However, these tiny figurative pieces tend to get lost, and then the game ends. Do not rush to throw the remains of the puzzle into the trash. They have many interesting uses!
Such an interesting and exciting game is to assemble a whole beautiful picture from small pieces. However, these tiny figurative pieces tend to get lost, and then the game ends. Do not rush to throw the remains of the puzzle into the trash. They have many interesting uses!
You can use puzzles to update the hard cover of a book, notepad, the outer walls of a pencil cup, plastic flower pots, or make a table rug.
You can use puzzles to update the hard cover of a book, notepad, the outer walls of a pencil cup, plastic flower pots, or make a table rug.
Old puzzles make wonderful bookmarks, construct convenient tracks for racing small cars, and create unusual wall decoration in a dollhouse.
From puzzles you can assemble an abacus on a wire, beads on a thread, and also a picture from hanging multi-level ribbons.
If you stick a pin to the puzzle, an icon will come out.
And from the surviving puzzle fragments, unusual handmade postcards are made. All you need is to select a puzzle piece that matches the theme and glue it to thick paper folded in the shape of a postcard. And then write your wishes.
An excellent gift can be made from the following materials:
Acrylic paints of different colors;
Paint brushes;
Glue;
Cardboard vertical photo frame (you can make it yourself from thick paper to fit the size of the future photo).
Cardboard vertical photo frame (you can make it yourself from thick paper to fit the size of the future photo).
Sequencing:
2. Place dots along the edges of each painted piece with a thin brush, which has been previously dipped into white paint. You will get a polka dot effect.
3. Allow time for the paint to dry.
4. Glue the puzzles onto the cardboard frame in any order.
Tips: You don’t have to color the puzzles, but choose multi-colored pieces and glue them like that. Or glue some fragments and then cover them with pearlescent varnish. It is better to place puzzles that are glued separately, offset on top of each other. This overlap will give the frame a voluminous appearance. And it’s not at all necessary to straighten the edges of the frame, cutting off the unevenness of the puzzles, because that’s the beauty of it.

If you want to get a smooth edge, pick up those puzzle pieces that should have been located along the edges of the puzzle.
Fantasize yourself, involve your kids in this activity. They are such inventors! Create a whole gallery of gifts that will delight your loved ones, family and friends.
I hope two big puzzles will come together soon and therefore I have to think about what to do with them next.
"You can start collecting a collection of puzzles (or continue if you already have one). Pictures from puzzles glued with tape or pressed with glass can serve as an original decoration for the room (for solidity, you can add a beautiful frame). You can also use the assembled puzzle as a table decoration, for example . Just cover it with glass of a suitable size. Some kind of still life of fruit is suitable for the dining table... For a worker, perhaps, you should choose some kind of warm sea view (especially on cold winter evenings) for work. ... or a landmark;) In addition, there is always the option of disassembling it and putting it back in the box.
Adviсe. If you decide to glue the puzzle with tape (budget option): 1) There is also a transparent adhesive film. Sold in rolls, about 30-40 centimeters wide. To glue it, place it on the surface, cover it with a cloth and iron it with an iron. If you decide to stick the puzzle on oilcloth:
If you decide to make a wall picture: You need a piece of cardboard of the appropriate size and a frame. Carefully transfer the puzzle to the cardboard (If the puzzle was assembled on the table, usually, it can be carefully moved onto the leaning cardboard. If this does not work, you can transfer it in parts with a flat scoop, spatula... Whatever is at hand. But it is best to use adhesive tape for windows (something like paper tape) - it leaves no traces when peeled off. Glue the puzzle along the front side. When the glue sets, carefully remove it). The cardboard should be pre-impregnated with glue. When the glue sets, insert it into the frame and... hang it on the wall! If you have the opportunity and desire, you can also stock up on glass of the same size. Then there is no need to glue it - you can simply press the puzzle with glass on one side and cardboard on the other. And secure it all with a frame. Looks beautiful!"
"1. Dear people!
To make the puzzle look beautiful you need to: buy suitable plywood, you can buy special glue (ask at the puzzle store, if the card is large, buy several jars at once), double-sided tape is also possible, and of course a frame.
Signature: PROF 12.;-)
2. I simply assemble the puzzle on one cardboard, cover it with another, turn it over, then spread it with glue (any kind) and glue it to the cardboard. I even out the edges with a blade and that’s it, the picture is ready!”
And a complex method, with photographs, about making your own frame can be read on the forum http://forum.puzzler.su/viewtopic.php?f=36&t=238
There is another option to order a frame, but, in my opinion, it will be three times more expensive than the puzzle itself. I also remembered the huge cardboard from the refrigerator and the not very large cardboard from the mirror and bathroom cabinet.