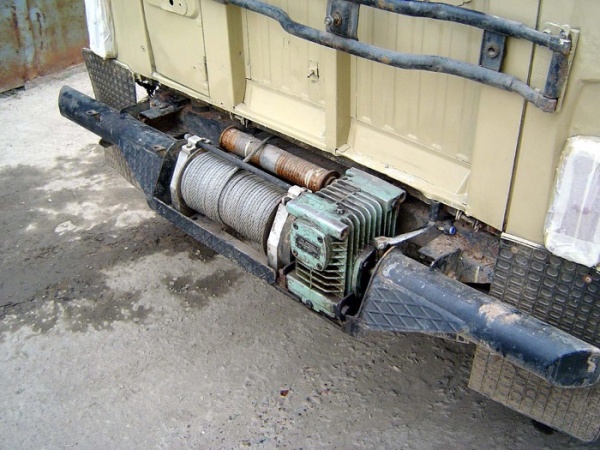
A very large number of off-road vehicles have high ground clearance and a very powerful engine, which helps them easily overcome the most difficult sections of the road. But in some cases, even these important features of SUVs are not able to pull the car out of the mud. In order not to find yourself in a hopeless situation, some cars are additionally equipped at the factory with powerful electric winches, which dramatically increases the car’s chances of independently overcoming any off-road section.
It is enough to attach its cable to any stationary object, for example, a tree, and turn it on so that the car can easily escape from any mud or swamp. But if an SUV has a chance to overcome off-road conditions without assistance, standard passenger cars, whose owners often go to places where there are no roads as a concept, are in a less advantageous position, and without a winch they risk getting stuck in the first puddle. Le the bed can pull a car of almost any weight out of the mud, but it is quite expensive. Not every car owner can afford to purchase a powerful and compact model. As a way out, you can consider making a winch from a starter yourself.
Winch - buy or make it yourself
It is worth immediately noting that a homemade winch made from a starter is not much inferior in power to factory models, since the starter itself is initially characterized by high power. In addition to electric, the winch can have a hydraulic and mechanical drive, but such designs are either difficult to manufacture independently or are ineffective for providing assistance on the road. In addition, mechanical options are too large and cannot be installed on a car.

Before you make a winch from a starter with your own hands, you should prepare all the required parts, which are selected according to the selected drawing of the device. As a rule, for production you will need the following:
- engine;
- gearbox;
- the basis;
- drum where the cable will be wound.
When assembling a winch from a starter with your own hands, the drawings of the device should be placed before your eyes, and not rely on your own memory - errors during assembly are unacceptable. If a ready-made starter is used as the basis for the device, the work is greatly facilitated. It should be understood that the larger the car for which the winch is made, the more reliable the starter should be. In order to increase the efficiency of the created device, it is best to take as its basis a starter with a planetary gearbox. With minimal electricity consumption, it is capable of developing very high power. It is also advisable to have all the required tools at hand in advance.

Assembly
For most motorists, assembling a winch with your own hands is a huge advantage, because if you do something for yourself, in any case you will do it with high quality. In addition, before making a homemade winch from a starter, its design is carefully studied and thought out, so the driver knows all the features of his winch perfectly and will be able to repair it in almost any conditions. If all the necessary parts are available, the winch from a car starter can be completely assembled within one to one and a half hours, after which it will be possible to begin testing it.
Important! The main component of the future winch is a drum with a cable, so the work begins with its manufacture.
If it is not possible to use a ready-made drum, it made of thick-walled pipe and 2 sheets of metal with a thickness of 4-5 mm. The cheeks are carefully cut to a suitable size and welded to the pipe. After this, you will need to weld a gear onto one of them, through which the force will be transmitted to the drum to carry out rotation.

If a starter with a planetary gearbox is used, the assembly process is greatly simplified, since there is no need to install a separately located gearbox, which is not so easy to obtain. A winch based on a planetary starter is powerful, lightweight and compact, so it can easily be placed on the front bumper of any SUV. After assembling it, it is necessary to pay no less attention to the installation of wiring. In addition, it is worth carefully considering the location of the control panel - it should not be near moving mechanisms, but at the same time be sufficiently protected from dirt and water. About, How a portable and compact winch can help is shown in the video:
Installation
Before installing a car winch from a starter with your own hands, you need to accurately determine its location. If it is equipped with a jeep with a plastic bumper that is not able to withstand any serious load, you will need to first create a power element and securely fasten it to the car body. After this, a platform for fixing the winch is mounted on it, for which Sheet steel with a thickness of at least 5 mm can be used. After marking, holes are drilled with a drill to mount the device itself.
Only after this can you proceed directly to installation. To connect all elements into a single structure, you should use bolts with a diameter of 8-10 mm- smaller ones may not withstand peak loads. After completing the installation of the winch on the site, you can begin installing electrical wires and a control panel or switch. It must withstand high electrical loads of at least 10 A, since the starter on which the winch was made consumes a significant amount of energy.
First activation and testing
To connect the finished winch with a car battery, it is optimal to use an adequate length of insulated copper wire with a cross-section of at least 2.5 mm 2. This will ensure a stable supply of electricity to the starter without loss. To attach the wires to the battery terminals, it is advisable to use alligator clips, which provide a strong and reliable connection. The switch installed on the winch significantly increases the comfort during its operation, since without it you will have to crawl under the hood and close the contacts manually every time you need to use the device.
Before turning it on, you should double-check not only the build quality of the entire winch, but also the strength of the fastening. If it is attached to the car bumper, you need to check that too. When you turn it on for the first time, you should not give the new winch a full load. After testing the device at idle speed without load, you can try to drag the car on a flat surface and, if the test was carried out normally, the winch is checked with a full load, which includes the total weight of the curbed car and the force required to pull it out of the mud.
Advice! When installing such equipment and using it frequently, it makes sense to install a more powerful battery, since energy consumption will increase sharply.
How to make the operation of the winch long and safe
After assembling, installing and testing the functionality of a homemade winch from a car starter, its operation begins. Depending on the weight of a particular vehicle, the load can be quite serious. To prevent the device from failing on your first off-road trip, you should not use a rope as a cable, even a strong and supposedly durable one. It is best to wind a steel cable around the drum, and before purchasing it, it is a good idea to read the technical documentation for it, which should indicate the maximum load.

Naturally, during the operation of the car, the cable, like the rest of the moving parts of the device, needs care. Regular cleaning of dirt, which accumulates on structural elements in large quantities, will be required, as well as lubrication of the mechanisms and the cable itself. When using a winch made with your own hands from a car starter, it is worth remembering that the starter itself is designed for short-term operation - no more than 15 seconds with a mandatory interval of half a minute. When used as a motor, the starter should be used in the same mode. If you cannot overcome an obstacle within 10-15 seconds, you should take a short break, after which you can continue towing. Naturally, at the moment the vehicle is pulled out, all passengers must leave the cabin.
The winch is an integral part of any real SUV. So, a winch for UAZ and cars like it is a real helper in bad weather. But what if you just need a simple and cheap unit that will help out a passenger car on a country road? A do-it-yourself winch, both electric and manual, is perfect for this. Let's look at the necessary materials and the manufacturing process.
What will you need?
If you are interested in a DIY winch from a starter, you can get by with cheap and common options. The motor from the VAZ-2101 electric starter is well suited as a power unit. They are quite common and cheap, but they do not have much power, but for a small sedan or SUV, for example, GAZ 69, they are quite enough.
You also need a shaft with gear and bearings, a piece of pipe for the drum and two round metal plates. You will also need sheet metal, various rods, bolts and nuts.
A self-made electric winch is good because you can use a lot of lying around and unnecessary materials.
Among the tools, you definitely need a grinder, a welding machine, and an adjustable wrench.
A winch is often needed on long and difficult trips. If you're an adventurous person, you'll also benefit from learning about building an expedition rack. Read this one. And for a fishing trip you will also need a boat trailer. Read about making it yourself.
Winch manufacturing procedure
In fact, the process of making a winch is quite simple, but it is worth following the order so that you do not have to redo the same work several times.

1. First of all, you need to connect the electric motor to the gearbox. To do this, weld a tube to the engine gear. Drill the other end through and weld two nuts. Next, put the tube on the gearbox gear and screw in the nuts that will serve as a retainer. To prevent anything from wrapping around the shaft, it is worth covering it with something. For example, you can peel off a piece of thin-walled plastic pipe.

Very important! Before fixing, be sure to check that the gearbox is reducing and not increasing the engine speed.
2. Now you need to make the second important part of the car winch with your own hands, namely the drum.

To do this, we take a piece of pipe and weld two metal round plates to its sides, which will limit the rope. The plates must have a through hole through which we pass the shaft with the gear and weld it.

It is important to maintain alignment, otherwise your shaft will wobble and cause unnecessary vibrations.

We weld two bearings on each plate (but not with the inside). Next, we pass the drum shaft through the bearings. To assemble the entire structure, you need 4 bolts, which we thread through a hole in one and the other plate, and screw a nut on the other side. As a result, we do this from 4 corners.

4. The gearbox must be attached to one of the plates so that its gear engages with the shaft gear.

5. Finally, you need to make a frame. To do this, you can make a rectangle from square profiles and weld square plates to it on one side, and also fix the motor and gearbox.
6. And finally, make the remote control. To do this, just one button is enough to close the contact. It must be spring-loaded so that when released, the contact opens.

7. Such a self-made car winch has one important nuance, namely, it cannot be fixed directly to the car. A fabric tow rope will have to be attached to the frame, which will act as an insulator. To get rid of this nuance, it is necessary to isolate the motor brushes from ground.
Hand winch

A do-it-yourself manual winch is structurally similar to an electric one, so you can follow the instructions described above, however, instead of an electric motor, you need to attach a handle that you have to rotate by hand. Thanks to the gearbox, it will be possible to significantly reduce the load on a person, but the power of such a winch will still be determined precisely by muscular strength. This is worth considering if you own a full-size crossover or SUV.

Now you know how to make a winch with your own hands. It has a fairly simple design and can be easily made from common and cheap materials, which will allow you to create even a temporary solution without extra costs before purchasing a branded unit.
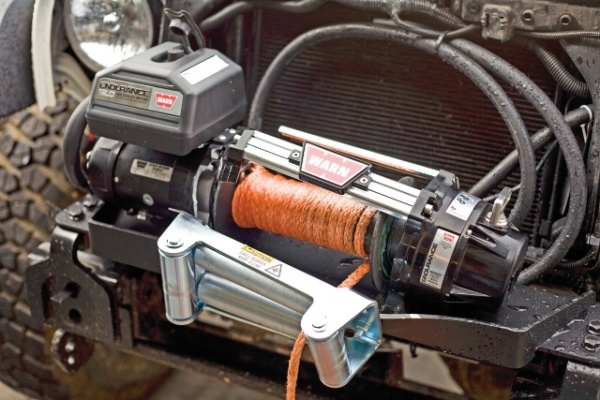
A winch is one of the most necessary tools that every off-road conqueror should have. After all, without this mechanism, it will be almost impossible to pull your car out of a ditch or ford. Some car enthusiasts purchase ready-made winches and install them on power bumpers, while others make them with their own hands.
And if you are in doubt about choosing the right tool, you can try to make it yourself. Our article today will help you with this.
What can a homemade winch be like?
It should be noted that devices of this kind are divided into several categories depending on the type of their design. So, a homemade car winch can be:
- manual;
- electrical;
- hydraulic.
However, despite the different design, all three types of devices have the same operating principle. It consists of the following: it is wound on a drum, which in turn rotates through an engine gearbox or thanks to the efforts of one’s own hands. To understand this in more detail, let's look at each of these types separately.
Electric winches
Often, the operation of these tools uses a car starter or a cargo generator. This homemade winch can also be powered by a separately installed electric motor. In other cases, car enthusiasts modify the starter and generator to operate in engine mode.

However, whatever the origin of this quinoa, it must have a high torque so that the mechanism can pull a 2-ton huge jeep out of a ditch. And since the main energy for operation is absorbed from the battery, car enthusiasts install batteries of higher capacity. However, an electric motor, no matter how powerful it is, should not discharge the battery so much.
Hydraulic devices
The design of such winches is more complex than that of their electric counterparts. As a rule, the drive is carried out using an oil pump. Despite their large size, winches of this type have great advantages - they provide the highest possible traction force, taking a minimum of on-board power from the vehicle. In addition to SUVs, such homemade winches are installed on a tractor or walk-behind tractor.
Handheld devices
These instruments are made according to the same principle as all others. However, here the role of the engine is not performed by a starter or an oil pump; all efforts are made manually, that is, by human efforts.

The power of such a device directly depends on the physical strength of the operator and the total length of the lever. Therefore, the homemade one is equipped with a rather long lever. This creates the greatest possible traction forces.
How to make?
A drum with a cable is the key component that makes up any homemade winch. The drawings of this device must be as accurate as possible so that the mechanism works correctly and reliably. It’s good if you have such a drum ready-made, because it’s much more difficult to make it yourself.

How to make your own drum? To do this, you need to take a piece of pipe with thick walls, and using electrodes and a welding machine, attach cheeks 5 millimeters thick to it. The driven gear must be attached to one of the last parts. The pipe itself is equipped with seats for bearings.
You can make a drum for a winch in another way. To do this, you need to have several hubs from any Zhiguli or Volga. They should be machined into a place for welding and the halves should be attached to a mandrel of the required diameter in order to achieve alignment of all parts.
It is best to take a gearbox with a large gear ratio (worm type). The main advantage of such a mechanism is that there is no need to create a drum brake. Most often, car enthusiasts purchase a gearbox from trolleybus doors - it is easiest to mount on the site.
If you decide to make a homemade winch driven by a starter, it is best to take a model with a planetary gearbox. This is what early Zhiguli engines were once equipped with.

To create a mechanism with a starter, the first step is to prepare a platform from a metal sheet. It is necessary to weld seats onto it, on which the drum shaft will then be mounted. After this, the gearbox is installed here with the input shaft facing up.
A homemade adapter is mounted to the gearbox on top. We need it in order to install the starter. A gear with a certain tooth module is mounted on the input shaft. Afterwards the starter is finally attached to the structure. At the final stage, wiring is done. That's it, now this winch can be installed on a car.
How is it installed on an SUV?
The first step is to determine the exact location for placing this equipment. It is best to secure the winch in the center of the bumper, and on its lower part. If an SUV has a plastic bumper, then, naturally, it will not withstand a load of 2-2.5 tons, and will simply come off the body. Therefore, instead of a plastic one, we install a durable, steel (power) impact element.
Next, on the power bumper you need to make a platform from metal plates for the winch. The thickness of the steel sheet must be at least 0.5 centimeters. The holes are then marked here and drilled with an electric drill.
Now the metal platform is ready to be installed on the bumper. It is worth noting that the winch is mounted here at the very last stage. First, the plate is attached to the bumper, and then the traction mechanism is installed to it. If the device is installed, the control panel is additionally connected to the vehicle’s on-board network. The connection to it occurs according to the following scheme - the “plus” is connected to the positive terminal of the battery, and the “minus”, respectively, to the negative terminal. That’s it, at this stage, the installation of a winch on an SUV can be considered complete.
How else is this device useful?
One of the main features of homemade mechanisms of this kind is the possibility of using them for purposes other than their intended purpose. This means that a homemade one can move heavy loads in the garden at any time.

To do this, it is not even necessary to remove it from the bumper (but in this case, you need to drive the car close to the location of the cargo, which is not always possible to do). Also, a homemade device can help you when uprooting old trees, stumps or transporting logs. Sometimes such a winch is used to move pallets with construction materials.
Nuances
However, this tool has its limitations. Homemade winches are not entirely safe, and therefore are not suitable for lifting loads, since they do not have a stopper. However, having made this tool once, you will not be afraid that your iron friend will get stuck off-road. At any moment, a homemade winch can pull an SUV out of a ditch, no matter how deep it is.
Winches are a very convenient device for lifting loads, which is why they are widely used among car enthusiasts. Since the cost of special equipment is quite high, a do-it-yourself manual winch will be the best option for motorists who prefer the best price-quality ratio. Also, using an individual layout, you can create a unique winch that will combine convenience and high load capacity. Compact homemade devices can be installed on any part of the car, which makes the mechanism a universal assistant for repairs and long-distance trips.

Varieties
There are several classifications of winches. The main purpose of the devices is to lift and move loads, so they are used in many areas. Motorists are faced with the need to lift heavy loads quite often. Lifting large components and assemblies in the garage or towing requires reliable securing of loads. Depending on the installation method, winches are divided into 3 types:
- Stationary. Installed on walls, ceilings, beams and other structures. Most often used in large car repair shops.
- Portable. Can be mounted on any suitable surface.
- Mobile. Installed on platforms on wheels. For a small garage, this type of construction is the most preferable.
A manual winch for a car is the most common among car owners. A manual drive is convenient for lifting loads in a garage, but its design must be carefully thought out.

The mechanism must include a brake system and a ratchet stop.
In the absence of these devices, operation of the winch is unsafe.
Machine-driven units require one or two drums. Such mechanisms are used mainly in elevators, cranes, and drilling rigs. When used in a garage, a drum-driven winch can make carrying and lifting objects much easier.
What do you need to know to make a winch?
When producing winches, it is necessary to take into account the load that will be exerted on the structure. For automobile winches, devices that can withstand loads from 500 kg to 2 tons are most often used. The lever winch is designed to lift loads to a maximum height of up to 4 m. The drum design can withstand from 250 kg to 2 tons and lift objects up to 30-40 m. Lever winches are very convenient to use and are common in use, as they have a reliable locking mechanism. The drum system is convenient to use when removing the machine from a ditch or lifting loads. The locking element operates automatically, so there is minimal danger for people working under the winch.
A manual winch for lifting and lowering a load can be using 2 types of drive:
- multi-speed;
- worm.
The multi-speed version has several pairs of gears, so the force has one of the highest values. One of the main disadvantages is the proportional increase in speed. Two bags will rise up very slowly, but when lifting a load weighing more than 2 tons, the rise will be fast.

When making your own winch, you can calculate the forces that will be exerted on the device and make several pairs of gears removable.
When creating a winch with a worm mechanism, it is necessary to take into account the forces that will be applied to turning the handle. The main disadvantage of this type of equipment is the constant friction exerted on the metal parts of the product. This design very often breaks at the site of the worm pair. You should also not forget about regular lubrication of moving parts. Do not put excessive load on the entire mechanism, as this will lead to premature failure of the equipment.
This design is the simplest and can be used in field conditions. A more practical type of winch would be portable equipment. The design involves the use of more complex parts that are manufactured independently. To improve operating efficiency, additional video reducer elements can be used.
You can find many drawings of homemade winches online. When choosing a specific drawing, it is necessary to take into account the conditions in which the equipment will be used.

If the winch will be installed on the roof or in the trunk of a car, then it is necessary to calculate the additional load that will constantly be placed on the device. If the winch is planned to be used in cold regions, then special attention must be paid to the quality of the metal.
Low-quality metal can lead to device failure at the most inopportune moment.
To make a winch we will need:
- rectangular pipe for the frame;
- finished shaft, or round pipe;
- steel sheet 3-5 mm thick;
- M10-M12 studs, 20-25 cm long, 6 pieces, nuts;
- hubs for the shaft;
- ready-made gearbox assembly or sprockets of large and small diameter with a chain, or gears;
- welding machine with electrodes;
- spanners;
- metabo with grinding discs.

Motorists note that homemade winches are reliable, practical and durable. For the drum, it is better to use a pipe with a diameter of 20-50 mm with a wall thickness of at least 3 millimeters. Using pipes with other parameters is impractical; then during operation they become deformed and the winch loses its functionality.
Assembly steps
Next you need to make the frame. To do this, we cut out blanks of the required length from a steel pipe with a diameter of about 2 cm, the ends of which are cut at an angle of 45 degrees. We weld the tubes together so that the angle of their connection is exactly 90 degrees. After this, remove the scale and polish the seams.
To create a drum, we need a sheet of steel about 3-5 mm thick, from which we need to cut two disks with a diameter of 30 cm. 7 holes are cut in each disk: one in the center of the disk, six around the circumference of the disk at a distance of about 7 cm. Diameter The hole in the center must correspond to the diameter of the device shaft.
The discs are fastened together using M10 or M12 studs, the ends of which are placed in holes along the diameter of the discs and secured with nuts and locknuts. You can also pre-fit metal tubes of the appropriate diameter onto the studs to increase the strength of the structure. Thus, the drum of our winch is ready. Next, we attach the shaft, which you can make yourself from a metal pipe or take a ready-made one from another mechanism. The ends of the shaft must be equipped with hubs to secure it to the frame.
The next step is to install a sprocket or gear on the drum shaft, depending on the gearbox being installed (chain or gear). Here the designs can be varied, especially with regard to gear transmission. The simplest ones are single-stage cylindrical or conical.
Depending on the gearbox you choose, provide a place to mount it on the frame of the structure, taking into account the location of the handle. Next, we mount the drum with the shaft and the gearbox on the frame, install the chain on the sprockets or gear train.
Don't forget to lubricate the gear teeth.
After this, we fix one end of the cable to the shaft and wind it onto the drum, and attach a carabiner to the other end of the cable. A hook or carabiner is also welded to the frame of the device for mounting on the frame of the car. Thus, a simple drum winch is ready for use.
How can you do without a winch?
If you don't have a winch and the time to make one, there is an easy way to assemble the following design:
- Take a crowbar, a piece of pipe, a strong cable.
- The crowbar must be buried deep in the ground. The tool is used as a rotation axis.
- A tube is used as a lever. Metal pipes are fastened with a crowbar perpendicular to the ground. The axis will rotate, so it is important to securely fasten the elements (for example, by welding).
- The cable is attached with a carabiner to a crowbar, and the other end to the object that needs to be moved.
- Next, using a tube, the cable is wound onto the axle.
- The longer the pipe, the easier it will be to wind.
Advantages and disadvantages of a homemade winch
The main advantage of a homemade winch is its high maintainability. The master knows all the fastening points, and also has the drawing according to which the device was made, so repairing the device will not be difficult. Even if a finished part was broken, then, knowing the design, it can be replaced in just a few minutes.
Another advantage of the device is its low cost. The winch can be made from parts available in the garage, so their cost is not taken into account when developing the project. The individual design will allow you to install the winch on any car and any part of it. A special mount will ensure reliable fixation on a vehicle or in a garage.
The winch is a mechanism that is widely used in many areas of life. The principle of its operation is to transmit traction force from the drive drum using a flexible element (chain, cable, rope).
Depending on the source of applied force, winches are divided into mechanical and electrical. You can make both of them yourself with a little effort and patience.
Homemade ratchet winch
Quite often there is a need to lift a heavy load and fix it in this position.
This could be, for example, a massive basement lid or large parts of a car.
A homemade ratchet winch will help you cope with such a difficult task. .
Most often, to make homemade winches from a ratchet, a worm gear from ZIL— it is the most compact and can withstand weight up to half a ton.
Ratchets from KamAZ and MAZ able to withstand weight up to two tons or more.
This is the most suitable winch option for home use. A solid load capacity will allow you to cope with relatively large loads if necessary. Lifting or dragging them. Let's take a step-by-step look at the entire process of creating a winch from KAMAZ ratchets.
To make a lifting device of this type you will need:

Two rear ratchets of a Kamaz car: left and right

Hooks for towing, 2 pcs.

Cable with a diameter of 4-5 mm.

Fist for releasing brake pads on a Kamaz vehicle

Hook bolt

Disassemble the brake ratchets, removing everything except the gear, as shown in the photo.

Next, cut off the pawl from the expanding fist and, using an angle grinder, popularly called a grinder, cut slots identical to those located on the other side. The ideal option would be to manufacture such a shaft in a mechanical workshop on a milling machine. Cutting slots with your own hands will require careful attention to detail and compliance with the rules and regulations for safe handling of power tools.

Take covers from an unnecessary used ratchet and make two washers for the future winch.

Weld the structure as shown in the photo and drill a hole along the diameter of the cable to fix it.

Install the ratchets on the splines, install the bolt and hang the tow hook on it. The structure can be strengthened by putting a bushing on the bolt. I did this using a bushing from an internal combustion engine mount.

We install a second towing hook on the free end of the cable.

We make and install a handle for easy operation of the winch.

Let's test the resulting mechanism. The winch is ready for use.
If you frequently use a homemade ratchet winch, the worm mechanism can quickly fail; in this case, it is better to replace the gears with stronger and more wear-resistant ones.
Homemade electric winch
A homemade electric winch will come in handy in the most difficult situations.
It will help pull your car out of a deep quagmire, saving money.
Its work is based on the principle of using the power of all kinds of devices, such as:
— various engines;
— generators from tractors;
— starters converted for engines.
Making an electric winch with your own hands is not difficult. You can use it for housekeeping, for example, use it in the process of plowing a personal plot, construction work, as well as in any other operations related to the movement of goods. Let's look at step-by-step instructions for creating this mechanism.
First you need to determine the necessary components:

Electric motor. For a home winch, it is not advisable to use a heavy-duty motor designed for a three-phase network. A small motor with a power of 2.2 kV and a voltage of 220 V is quite sufficient. We offer an electric motor more powerful than in the video. Practice has shown that a device with a power of 1.1 kW cannot cope with plowing. And the 2.2 engine was tested at the dacha.

Electromagnetic starter PM2 16A, remote control, capacitor, wire PVA 3X1.5

Gearbox 1:40.

Pulleys (2 pcs) and a belt for arranging the transmission from the electric motor to the gearbox.

Bearing 180306 in housing (2 pcs).

Drum shaft.

Splined part from the outer grenade (2 pcs).


Rolled metal of various thicknesses and sections for the manufacture of frames and drums.

Hardware for mounting the engine, gearbox and drum.
To carry out work on the manufacture of the mechanism, you will need: a mechanic's tool, an angle grinder, a drill and a welding machine.

Kinetic diagram of a winch with an electric motor
Before you start making a frame for the unit, you need to sketch a sketch of the future metal structure indicating the dimensions. To do this, you need to take a sheet of paper and draw a frame, then use a measuring tool to take all installation dimensions and plan the placement of the electric motor, gearbox and drum on the sketch. The video posted above will make drawing up a drawing easier. Based on the sketch, it will be easier for you to prepare the necessary rolled metal and hardware for the future unit.

We weld a common frame from a rectangular pipe, onto which we mount an electric motor and gearbox with installed pulleys and a screwed base made of a profile pipe. To ensure that the belt does not sag, we make the engine platform on canopies, then spot weld the canopies to the frame of the unit, as shown in the photo.

We install the gearbox on the corners. We put on the drive belt and check its tension. We weld the base of the gearbox.

Let's move on to making the drum. We weld metal washers to the pipe with a diameter of 159 on both sides, as shown in the photo.


Next we proceed to welding and assembling the shaft. We weld the splined part of the grenade into the end of the shaft as shown in the photo and insert the shaft inside the drum. We stuff bearings and housings onto the shaft and spot weld the shaft to the drum. We weld the second splined part of the grenade to the gearbox shaft.

We align the drum using available means to maintain the alignment of the gearbox shaft and the drum. Next, using a corner, we secure the drum bearing housings with spot welding.
We connect the electrical equipment of the winch and do a test run.
If the testing was successful, turn off the power supply, remove the electric motor and gearbox and weld the joints. Then we put the winch mechanisms in place. We fix the cable on the drum. On the other side of the cable we install a towing hook. A homemade electric winch is ready.
This mechanism has a fairly large load capacity, but requires time to assemble and lack of moisture.

For safe work with heavy weights, it is advisable to equip the electric winch with a small and simple remote control.
Homemade winch for farming
All kinds of winches are an indispensable thing for motorists. But a homemade winch for the farm can also be successfully used.
Here, such devices are most often used to move loads along a horizontal surface, for example, heavy logs.
Farmers often use winches by installing them above the attic opening, thus moving loads between different parts of the room.
And some manage to use a homemade winch to plow the land.
To do this, just secure it to the edge of the site, hook the plow to the end of the cable and turn on the winch.
The mechanism pulls the plow, and the person can only give it direction. Using a winch, you can not only plow the ground, but also carry out all cycles of tillage.
We offer a winch for home work, or more precisely for hilling potatoes based on an angle grinder. Almost nothing is needed to make it. We present it as a modification of our winch with an electric motor.
When the engine turned out to be low-power, and I still had a new one, the idea arose to remake the drive. We decided to use an angle grinder. What came out of this is up to you to judge. We will tell you how the modification took place.

Let's start with altering the frame; the engine platform must be adapted to the angle grinder. The canopies and the original appearance of the site remain unchanged. The only thing you need to do is raise it on the frame with the corners to give tension to the belt.

The grinder has threaded holes for attaching handles. It is in them that we insert the bolts to secure the angle grinder to the platform, additionally weld the corner to the platform, as shown in the photo, and secure the electric drive with another bolt.


Then we weld the corners to the frame and raise the platform. We put a pulley on the grinder, put on a belt and carry out a dry test. Next, we carry out full testing on a potato field.

Homemade mechanical winch
In emergency situations on the roads, a homemade mechanical winch will become your indispensable assistant.
It will not take up much space in the trunk of any car and will allow you to solve the problem without involving strangers.
To operate this type of winch, you only need your physical strength. A homemade mechanical winch works on the principle of a lever.
By applying force to the lever, you wind the cable around the axle, and the longer the lever and the greater the physical force applied, the more weight can be moved
A winch helps you cope with numerous complex tasks, so it is desirable for every practical person to have one.
But this does not mean that you need to spend a lot of money to purchase it. The design of the winch is quite simple and allows you to build it from available materials.
You will need:
— a section from a pipe;
- strong cable;
- a strong stick.
A piece of pipe will serve as the basis for such a winch; we attach a cable to it, and make a handle from a stick.

If there are no suitable sticks nearby, take a second piece of pipe and make a handle from it. That's all - a do-it-yourself winch!
When force is applied to the handle, the tube mounted on the axle begins to rotate and wind the cable around itself. The axle must be securely fastened, for example, driven well into the ground.
And this must be done at an angle so that all the elements of the homemade winch do not jump off the axis during operation.
Homemade winches for cars
Today, bad roads, numerous holes and potholes are everywhere, making it difficult for motorists to travel normally.
You can easily get stuck somewhere and hope for help from strangers.
However, it may be delayed, so it is better to have a backup option that does not depend on external factors and assistants. In such situations, a winch can save you.
Not every car is equipped with it, because high-quality winches are quite expensive, and those that are cheaper are short-lived and do not always have enough power to rescue a seriously stuck car.
That is why homemade winches for a car are considered the best option.
Such winches can be either simple and made by hand in a maximum of 30 minutes, or more advanced, but also homemade.
Selected for you: