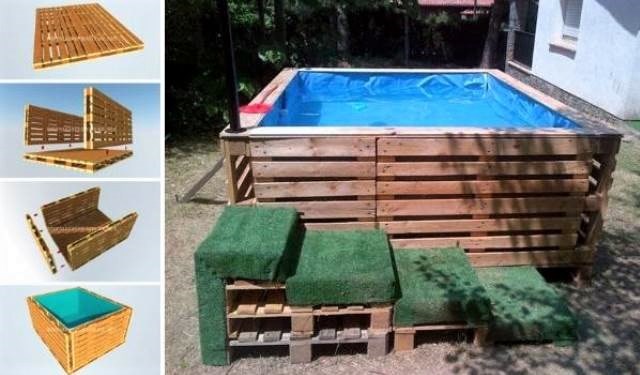
Wooden pallets are a brilliant invention. Serving as a pallet is almost a secondary function. On a hot summer day it's nice to splash around in cool water, and it's especially nice to do this in your own pool. If you don’t have a pool, but really want to have one, then we invite you to get acquainted with the design of one original homemade backyard pool, made from simple wooden pallets. This design required 9 pallets, but the number may vary.
The summer season is just around the corner, many people want to have their own pool, but not everyone can afford it.
One inventive German decided to create his own swimming pool from simple wooden pallets.
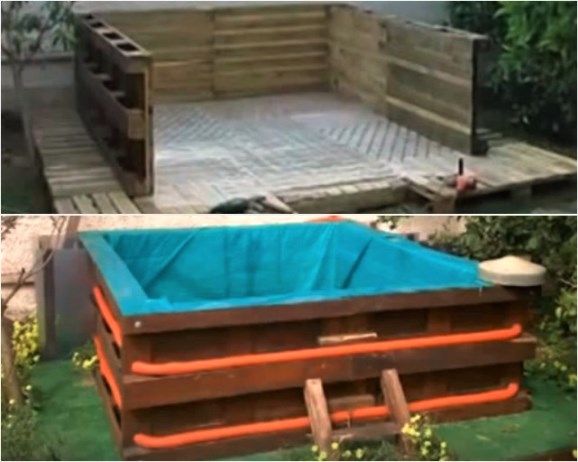
The first thing he did was build a frame from pallets

Fastening them together using additional boards and ties


Layed waterproof material, padding the joints with towels and fabric to soften

Covered with another waterproof layer - film

For beauty, the top of the pool is decorated with straw

Perhaps many of us have dreamed at least once in our lives of having our own swimming pool on our property. However, for most this is an unaffordable luxury, and there is also not enough space.
One enthusiast from Sweden solved this problem in his own way and built a pool from... wooden pallets. The cost of the entire structure did not exceed 80 dollars. 
Swede Torben Jung made his own swimming pool from recycled materials.
Torben Jung had long dreamed of having his own swimming pool on his property, but he didn’t have the money. Then, after reviewing many sites with plans and projects on the Internet, Torben decided to build a pool himself. He took photographs of every stage of his work and then posted them on social networks.
1. Wooden pallets

Wooden pallets are the basis of the pool. 
Tensioning straps strengthen the structure.
Torben needed 9 wooden pallets to which he nailed slats. To prevent the structure from falling apart, the guy additionally secured it with tightening straps.
2. Waterproof material and towels

Towels are spread out for softness. Inside the future pool, Torben laid out waterproof material, and laid out several towels on top of it so that the joints did not press into the backs of swimmers.
3. Another blue waterproof lining

Waterproof blue material. Next came blue waterproof material attached to the edges of the pallets.4. Bamboo facade

The outside of the pool is lined with bamboo.
The final stage in the construction of the pool was decorating it with bamboo branches, hiding all the internal materials.5. Water pump

Water is pumped out using a pump.
To prevent the water from blooming and stinking, Torben also took care of the pump. Now, if necessary, the guy can easily change the water.
I think any of us wants to have our own pool near our home or at our dacha so that we can cool off in cool water during the hot summer. But many people think that making a large swimming pool with their own hands is very expensive. In this article we will dispel this myth and show how you can build a swimming pool in your country house from wooden pallets and other inexpensive materials for little money.
Swede Torben Jung also dreamed for a long time of having his own pool on his property, but his finances did not allow him to buy a ready-made one, and then one day he got tired of everything and built a pool from scrap materials and the cost of its construction was less than $80! He found instructions on the Internet and immediately set about making this pool. He filmed the whole process and posted it on his Facebook page so that other people could also repeat this design.
The base of the pool is assembled from wooden pallets; Toben placed 9 pallets in a circle, knocking them together with boards in the upper, lower and middle parts.

To further strengthen the structure, he reinforced the pallets with tie-down straps.

He then placed a waterproof liner throughout the pool and placed towels over the joints of the trays and the bottom of the pool, this was done so that the trays would not put pressure on people’s backs. He sent another layer on top - a waterproof tarpaulin - and secured it to the top of the pallets with duct tape.

To give his pallet pool a traditional color, Toben chose another waterproof material in a blue hue. First secured on top with tape, and then with wooden handrail boards, which were nailed to the top of the pallets.

After Jung covered his pool with siding made from bamboo branches, no one would even think that the pool was made with his own hands from ordinary old pallets; it now looks quite expensive.

All that remains is to add water to this pool and enjoy swimming, but that’s not all, to replace the water, the Swede bought a simple water pump and now replacing it is not difficult and the water in the pool always remains clean.

On a hot summer day, it’s hard to deny yourself the pleasure of cooling off in a cool pond. Not everyone has a country house on the banks of a river or lake, and building a permanent pool requires space, time, and material costs.
Is there an alternative to capital expensive construction? Fortunately, people's ingenuity did not ignore this issue. We have selected not just the most interesting and simple ideas, but also the most viable ones that can be realistically implemented on a summer cottage without special skills.
The presented structures are not designed for 10-year use; they do not comply with all swimming pool construction standards. But the authors set completely different goals: cheap, fast, seasonal. Nevertheless, certain rules must be followed during such construction, so first we will familiarize ourselves with the general recommendations.
Important points when planning and building a homemade pool
Regardless of the choice of material for the construction of a seasonal pool, we recommend paying attention to the following points:
- the place for the pool should be in direct sunlight, and not in the partial shade of the garden: the water will heat up faster and there will be less debris in the form of falling leaves and insects;
- the area must be leveled and compacted;
- the bottom and walls of a homemade bowl should not have sharp protrusions or a hard surface;
- you need to immediately think about how and where the water will be drained during regular replacement (especially if installing filters is not provided);
- the frame needs to be strengthened so that the structure does not fall apart under water pressure;
- when purchasing a waterproofing film (tarpaulin), take into account the size of the container with a margin of 50 cm around the entire perimeter.
When installing a budget pool, do not forget about landscaping the area around it. You can make an embankment of pebbles or river sand around the perimeter, decorate the approaches with decking boards, or simply knock down wooden flooring from old pallets. Also, for comfort, it is advisable to consider a towel rack.
Just dig a hole and cover it with film
The first stage is the most labor-intensive - digging a hole of suitable size and depth. When the pit is ready: the bottom is leveled and compacted, the walls are perpendicular to the bottom and do not crumble, proceed to the second stage - preparing the surfaces.

Cut cardboard boxes are laid on the bottom to make it soft to step on. The walls are covered with bags so that the film does not tear on uneven surfaces and plant roots.
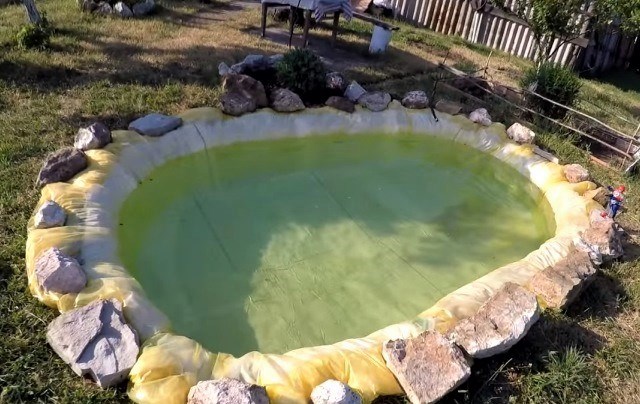
At the third stage, the pit is covered with waterproofing film. The upper edge is pressed with stones, which additionally plays the role of decoration.
You can bury a bowl made of scrap materials, covered inside with film, into the soil. This will require a lot of effort, but it will be possible to increase the depth of the pool. Since the edges of the bowl protrude above the soil surface, the soil will not be washed into the water.
We are sure that you will like the idea of having a swimming pool. And by next season you won’t want to build temporary structures. The optimal solution would be to organize a pleasant vacation spot for many years to come. To build a private pool, it is best to contact professionals who will help at all stages of its construction. The company "POSEIDONSTROY" has already received many good reviews. They will be able to make a pool according to your wishes or offer standard projects for implementation.
Frame pool made from pallets
To begin, choose a flat area and cover it with a thick tarpaulin (perhaps an old banner or canopy). Next, take 9 pallets and fasten them with screws and slats. Pallets are placed on edge, connected by a ring. When the round frame is ready, it is secured with tie straps for additional rigidity.
At the next stage, the inner surface of the “bowl” is covered with thick greenhouse film, and old towels, bedspreads or blankets are placed on top at the junction of the pallets and on the bottom. This is done to soften the surface so that while swimming it is comfortable to press against the stacks and walk along the bottom.
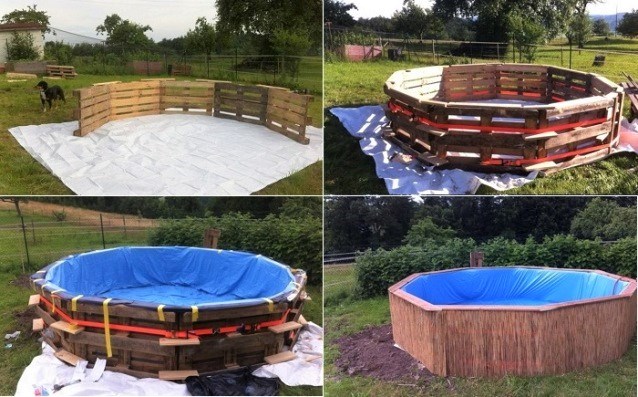
The final layer is a waterproofing film. If it is blue or blue, the water in the pool will always be bright. Some advise using black film to improve water heating. It is important that under the film there are no open sharp corners, protruding boards or rough surfaces on which the film will quickly tear.
The film is secured to the top edge of the pallets using a special adhesive tape. For decorative finishing of the outside of the pool, you can use reeds or bamboo. Narrow boards are nailed on top to hide the pallets.
The frame can also be made rectangular by connecting the pallets at right angles. The bottom can also be lined with pallets.
To create the most comfortable area, you can attach a lighting stand to the corner and make steps from pallets.
These pools are filled with tap water from a garden hose and drained manually or using a low-power pump. If chemicals were not used for disinfection, then vegetable beds and flower beds can be safely watered with water.
Pool made from old boxes
The frame of the pool can be made from old wooden or plastic boxes. They make up a rectangular box, fasten each one together and additionally wrap it around the perimeter with plastic tape.
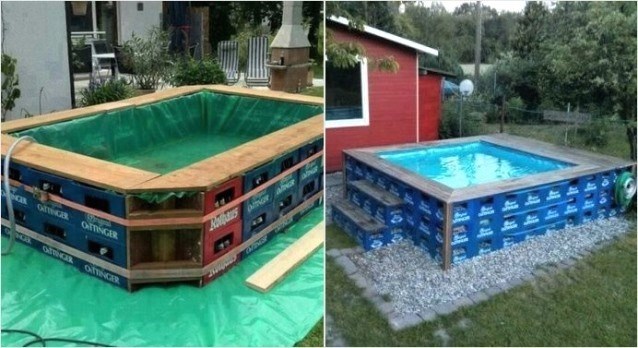
The structure is assembled on a tarpaulin. The inside of the box is covered with a thick waterproofing film, pressing the top edge with wooden boards.
A pond made of hay - simple and cool

Looking for available materials for the construction of a swimming pond in the dacha sector, enthusiasts turned their attention to hay, which is an indispensable attribute of agricultural land.

It is spread out on a prepared area, and sides are built from rectangular compressed bales. Further, everything is according to the already shown scheme: a thick film is covered in the resulting bowl, the structure is tightened with belts. To protect the waterproofing film from damage, cardboard or a thick tarpaulin can be placed on the hay as the first layer.

Pool on a metal frame
For those who are familiar with welding, it will not be difficult to make a simple pool with your own hands from metal.
Each wall is made separately from a profile pipe and galvanized sheet. The structure can be assembled by welding or made dismountable with bolts.
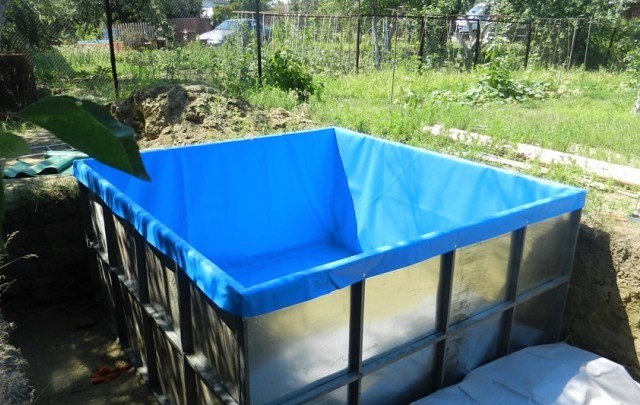
An insert made of waterproofing film is installed inside, which, if desired, can be made to order according to the dimensions of the resulting structure. You can decorate such a pool using flooring from pallets, and also make a cover.

To increase ease of use, it is recommended to install a pump with a filter and use disinfectants for regular use. Thanks to this, your pool will not turn into a muddy swamp in a few days, the water from which will need to be completely pumped out and replaced with new water on a regular basis.
Mini-pool made from a large tire
Our selection will be completed by a very simple idea for making a pond from a large diameter tire from heavy special equipment.

To expand the future pool, the first step is to trim the sidewalls of the tire. The resulting workpiece is installed on a previously prepared concrete platform and filled with concrete. Thus, the tire and concrete form a bowl, which, after the concrete has dried inside, must be painted with a special paint.
As a result, you will get, albeit small, but not requiring much effort in maintenance and a very cozy pond that will help you cool off on hot days.
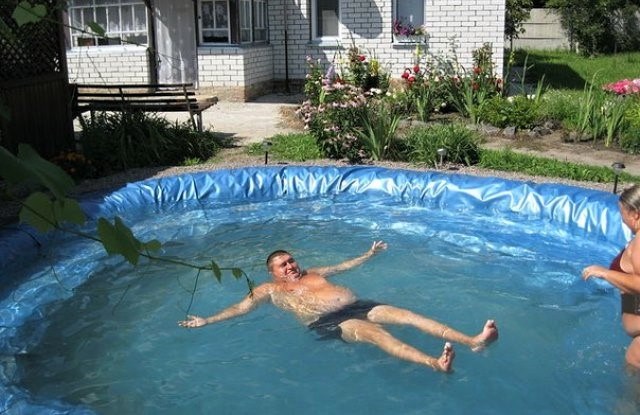
Swimming in the pool on a hot day is the dream of most owners of suburban areas. It would seem that such luxury is the prerogative of large landowners who invest substantial money in the development of the territory. But even on a modest 6-10 acres, realizing the dream of splashing around in the summer is not a difficult matter. In a couple of days, an ordinary summer resident can build a pool from pallets with his own hands, and if necessary, disassemble it or move it to another place. In this article we will look step by step at how to build a pool from pallets in a small country house or in the courtyard of a private house.
Design Features
There are many constructive solutions for independent arrangement of artificial reservoirs. A tank in a pit or an above-ground bowl made of blocks and concrete are capital structures erected once and for many years. Frame pools - a PVC container in a sheathing, a collapsible version. Such pools of different shapes and sizes are sold ready-made, but if you wish, you can make a small swimming pool on a frame with your own hands.

DIY pool
A pool made of pallets is a homemade economy class frame structure. From used materials available at hand, you can quickly and inexpensively set up a comfortable place to relax. The number of pallets available determines whether it will be a small tank for relaxation or a full-fledged pool in which you can swim.
If desired, a pool assembled with your own hands from pallets can be finished so that it lasts for several years. To do this, the platform under the bottom is prepared separately: leveled, covered with pebbles, sand or lined with foam plastic. The slightly recessed (20-30 cm) structure of the pallets will ensure additional stability of the sides under water pressure throughout the entire service life. All wooden elements of the structure are treated with water-repellent impregnation. If a bathhouse made from pallets, assembled for two to three weeks, is often not decorated in any way, then a pool designed for at least 2-3 seasons fits harmoniously into the landscape design of the site.

Mini-pool made from pallets
Advantages and disadvantages
The possibility of arranging a reservoir without the involvement of specialists or serious financial investments in a capital hydraulic structure is already a huge plus. If we consider the advantages of a pool made of pallets for a summer house in detail, we get the following picture:
- The time for independent arrangement from scratch is from several hours to 2-3 days (depending on the volume, availability of material, number of workers).
- Minimum financial investment (you can only use used materials).
- A fully decorated building is a spectacular accent of garden design.
- Implementation of the project at all stages is possible alone.
- If necessary, the structure can be dismantled in a few hours.
It would be hard to call the fragility of the design a minus. With minimal investment, it is impossible to create a pool from improvised materials for a long period of time.

Self-assembly of a pool from pallets
Drafting
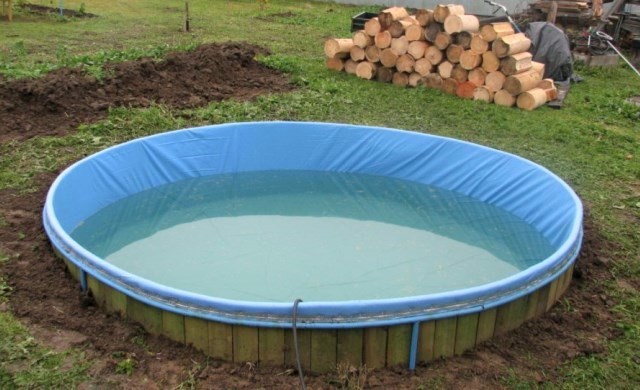
The project is compiled either based on the availability of pallets, or, having enough consumables, on the desired volume of the bowl and the height of the sides. Wooden pallets, the standard dimensions of which are 80x120 cm, are installed vertically (side height 120 cm) or horizontally (side height 80 cm).
Round, oval, rectangular or square - these are all possible shapes for tanks. Elongated ponds allow you to swim, while compact ones allow you to passively enjoy the water and the sun. Having settled on the specific shape and volume of the structure, they make a diagram to calculate the amount of materials required for the work.
Required materials and tools
The construction of a medium-sized bathhouse requires 10 standard pallets. Let's consider the calculation of materials using the example of a rectangular pool with a side of 120 cm. Length - 4 pallets (320 cm), width 3 (240 cm), a total of 14 pallets. The maximum volume of the tank falls slightly short of 9 m3, i.e. the frame made of wooden panels must contain water pressure with a total weight of slightly less than 9 tons.

Wooden pallet
The most expensive component of the project is the film. Use regular or line-reinforced film for greenhouses; the denser it is, the better. If possible, purchase a film for waterproofing reservoirs - a special material for swimming pools. The rich blue color of the inner surface of the pool is the color of the polymer coating. Black film for waterproofing garden ponds will cost less. Such a pool does not look so impressive, but the water in it is always warm: the black surfaces quickly warm up. Used suspended ceiling fabrics are also used.
We calculate the size of the film by adding all the dimensions plus the allowance:
- bottom length 320 cm + two sides of 120 cm + allowance on each side of 20 cm, total - 6 m;
- bottom width 240 cm + two sides 120 cm + allowance on each side 20 cm, total - 5.2 m.
The standard width of black film for ponds is 6 m, i.e. 6 m.p. of material is enough to equip a pool of the given size.

Pond film
So, to make a reservoir bowl you will need the following materials:
- Pallets - 14 pcs.
- PVC film - 6x5.2 m.
- Old linoleum, tarpaulin - cover the area under the structure.
- Unnecessary blankets, rugs, etc. to cover the bottom, upholster the inside of the sides of the bowl for greater comfort.
- Fasteners: long screws, clamps, slings (towing cables), beams, boards, metal brackets - everything that can be used to connect board pallets into a single structure).
- Scotch tape is an auxiliary means of intermediate film fastening.
- Plywood boards, PVC panels, decking boards - any suitable material for exterior decoration of the frame.
- Moisture-repellent impregnation, antiseptics for wood.

Basic materials for making a pool
Tools needed for assembly:
- jigsaw, circular saw or hacksaw;
- screwdriver, hammer;
- roulette;
- If you plan to deepen the tank, you will need a shovel.
Assembly of the structure
Pallets, boards, and bars are treated in advance with protective compounds so that the material is dry by the time the structure is assembled. Step by step, assembling a pool with your own hands is carried out in several successive stages.
Preparing the site
We mark and level the site, mark the boundaries. If a recessed option was planned, we dig a pit, the area of which is larger than the size of the bottom of the future pool. Since the height of the pallet itself is 15 cm, and the sides are formed by placing the pallets on edge, the area of the pit is greater than the area of the space between the four sides by exactly the height of 4 pallets, that is, 60 cm. The depth of the pit is determined by the planned “landing” of the frame (20 -30 cm) and the thickness of the “pillow” (5-10 cm). Sand and gravel are leveled and compacted. A cheaper option for a “pillow” is to cover the bottom with foam plastic or penoplex. We place the slabs end to end so that there are no gaps.
Bottom device
We cover the bottom of the pit or a leveled prepared area with linoleum, tarpaulin, roofing felt, or any material at hand.

Sequence of building a pool from pallets
Wall placement
We stack the pallets close together with the boards facing inward. We connect wooden elements at several levels with self-tapping screws, clamps, and tighten them with slings around the perimeter 10-15 cm from the ground, in the center and 10-15 cm below the upper border of the side. We cover the bowl with available materials (blankets, floor coverings), and upholster the sides. On the one hand, such upholstery will provide comfort for swimmers: leaning on boards covered only with film is not very pleasant. On the other hand, the cushioning material will prevent accidental damage to the film from contact with the boardwalk.
If there is not enough fabric upholstery on the sides, use plywood panels, PVC panels, or any suitable material.
Waterproofing
We lay the film, straighten it in all the inner corners so that it lies freely and does not stretch, forming voids, especially underfoot. We fix the film allowance to the outer wall of the sides with tape. Fill with water to make sure the resulting tank is sealed.
Installation of communications
Spending only weekends at your summer cottage, you are unlikely to want to install equipment in the pool for collecting, draining, and filtering water. You can get by with a regular hose without any tools - drain the water by gravity.
If the pool is in the courtyard of a house, where people want to cool off all summer, the water will have to be changed sometimes. In this case, it is worth considering installing simple mechanisms for servicing the pool. You should not use vibration pumps for pumping - there is a high risk of damaging the film if the pump body touches the bottom. You should purchase a bottom pump: many models, in addition to pumping liquid, serve as a filter. After assembling the pool, water is poured in to test the tank for leaks. At the same time, they check the operation of the equipment.

Outdoor pool filter pump
Decorating and filling with water
Successful tests allow us to complete the installation of the structure - to carry out finishing work.
- Along the top edge, the edge of the sides, we connect adjacent pallets with boards or bars, while simultaneously fixing the film on the sides.
- We sheathe the frame from the outside (sides and edge), giving the structure a finished look. If the finishing material does not have decorative qualities (sheets of plywood, ordinary boards), we cover the cladding with stain.
- Installation of ladders, stairs, handrails is the final stage. Then pour water. As soon as it warms up, you can open the swimming season.
Care and maintenance
An outdoor pool requires maintenance, as insects and leaves will get into the water. Floating debris that has settled to the bottom is collected with a net. After swimming, the pool should be covered with material that does not allow light to pass through: the sun's rays gradually cause the water to color, and the sides and bottom become slippery. An opaque shelter will slow down this process and allow you to change the water less often.

Pool covered with protective film
A universal building material - wooden pallets - allows you to spend the summer with pleasure, with a personal pond, made with your own hands and not at all expensive. Swimming season at the dacha in a pallet pool is an excellent option if you can’t go to the sea.