There is a small house on your summer cottage and you decide to add usable space to it. And here the question arises - how, or at least a terrace, and so that such construction would not be expensive.
What is a veranda and a terrace, what is the difference
Veranda is a closed, unheated room, which is most often attached to the main part of the house, or is located directly in the house and is part of it.
The main material for the construction of an enclosed space is boards (beautiful and stylish). But nowadays, country craftsmen have begun to use other available materials (who has what).
For example, an attached room can be made of:
- bricks;
- timber;
- foam blocks;
- flat or wavy slate;
- sandwich panels.
A terrace, on the contrary, is an open area that can be either slightly raised above the ground surface or located directly on it.

As a rule, the floor of the terrace is covered with boards, special stone or even asphalt and concrete. If a floor plank is chosen for the flooring, then it is recommended to lay it on bars treated with an antiseptic (the main thing is that the flooring is blown with air and dries quickly after precipitation).
But many people fence the perimeter of the open space with beautiful railings and build it, which serves as shelter from rain or sun. Also, the terrace can be built at some distance from the house, and the approach to it can be made in the form of a covered passage.
There are many construction options - photo:


How to attach a veranda to your house
Most often, a veranda is attached to the house with your own hands according to the scheme. The standard sizes of such buildings are usually 3x4 or 4x6 m, but you can safely deviate from the standards, the main thing is that it is comfortable and beautiful.
Where to begin ? Take the dimensions of the future building, draw a sketch on paper and weigh and think through everything many more times! Carry out a thorough breakdown of the area and mark everything along the axes using cords and driven stakes. On the selected site for the construction of a veranda, you need to remove a layer of soil of 8-20 cm (depending on the place of residence).

What foundation to make for the veranda
It all depends on the weight of the wallet. Some will make it the same as at home (ribbon), while others will prefer a simple one - columnar.
Home craftsmen use various materials for the foundation of an enclosed space:
- brick;
- stone;
- concrete;
- asbestos-cement, iron or wooden poles.
Usually they choose one that is laid at each corner of the building. If the building is long, then the columns are also added in the middle.

Typically, a hole for a pillar is dug to a depth of 50-90 cm, sand is poured onto the bottom and a pillar base is built on top. The level of the pillar is adjusted so that the floor of the veranda is 30-35 cm below the floor of the house. Then, without any problems, you can adjust the roof of the attached veranda to the roof of the main building.
And you can do without a foundation. It is done like this: where the bottom trim will be, there you need to remove the fertile layer of soil and instead add a layer of clay, gravel or gruss (taken from road quarries). On top of the bulk layer, you can also add (if available) a couple of centimeters of crushed stone and lay a strapping made of railway or larch logs directly on such an embankment.
Frame construction
To build a veranda you will need:
- lower and upper trims;
- vertical racks;
- external cladding;
- window frames and glass;
- roof rafters;
- roof.
For racks and frames, take logs approximately 120 mm in diameter or beams with a section of 100x100 mm, or 80x80 mm. The sheathing of verandas is done not like that, but only from the outside without using insulating materials. In order to prevent the walls from being blown through, boards with quarters (using the example of lining) or tongue and groove boards are used.

Since a large area of the veranda walls is spent on glazing, it is enough to use short-length inexpensive profiled material for cladding (even planks from boxes 1.5-2 cm thick will do).
When building a veranda yourself, first make the lower trim. If you choose, then on the cement surface you need to lay several layers of roofing material and trimmings of boards treated with resin, 4-5 cm thick. And the crowns of the lower trim are placed on these boards. The same is done with a columnar foundation.

The lower bars must be connected using a straight lock. Also, logs for the floor slats and vertical posts need to be embedded into the bottom trim. Use staples to firmly secure the structure.
Do not place supporting racks at a great distance from each other (50-60 cm is just right). Then you can use any short material for cladding, and the extension will be strong. Do the same step for the attic floor.

Also, flat or wavy slate can be used for cladding, which will look good after painting. By the way, windows play an important function on the veranda of the house, since they usually occupy two or three walls, and the joints can easily be covered with wooden trim.
Floorboards are laid without insulation. When making the roof of the veranda, you can use the same materials from which the roof of the house was made.
When adding a veranda, you should not tightly connect the new structure and the house together, since the conditions and period of operation, as well as the weight of the main building and the new building are different. It is necessary to leave a gap of 3-4 cm between the house and the attached veranda.
After finishing the sheathing, the gap must be closed with a flashing board. The junction of the veranda roof and the wall of the house must be covered with an apron made of galvanized iron.
Verandas attached to the house - photo:


P.S. That's all, good luck with the construction everyone!
Every little thing, created with love, decorates the house. A self-made veranda is ideal for relaxing in the lap of nature. This place can be used for organizing family celebrations or spending private leisure time.
Design Basics
Sketch of a house with a verandaIt is necessary to consider the veranda as part of the house, and not to single it out as an independent structure. The peculiarity of the veranda is that its construction can be carried out simultaneously with the main building or some time after the completion of the house. As a rule, the extension is carried out from the facade or from the end, that is, in any case, a ready-made doorway is required. Sometimes, the absence of a door does not stop the flight of design ideas, but a decision is made to create another door in the required location.
Verandas are:
- open. In this case, the walls are partially (upper half) missing. The roof is installed on beams;
- closed. In this case, half or most of the walls are glazed.
 The veranda should continue the style of the house
 When developing a veranda project, you should take into account the style of the house; its size and shape should harmoniously serve as a continuation of the main building, while the choice of materials should also be appropriate. The most suitable sizes for it are within the following limits:
- length – 4-7 m;
- width 2.5-3.5 m.
A smaller area can turn the veranda into a cramped room of unknown purpose, and a larger one can disrupt the harmony and comfort that such a structure should create.
Heating of the veranda, including indoor spaces, is most often not provided.
Material selection
When constructing a veranda, you should use the rule: the style of this extension must stylistically match the house. In addition, the compatibility of materials and their combinatorial nature should be taken into account. Let's look at the most popular materials for building verandas.
DIY polycarbonate veranda: a modern solution
Polycarbonate is a modern material that successfully competes with traditional materials.
 Polycarbonate - a modern material
 Polycarbonate is a very durable material and, therefore, its manufacturers rightly claim that it is safe to use. The material has good flexibility, and its deformation does not require special thermal preparation or devices; it can be worked with at any temperature. The cost of the material is relatively low. If we compare it with glass, the price difference between these materials is significant.
Due to a significant increase in the deformation coefficient, temperature changes have a negative impact. For specialists, this factor is nothing more than a certain inconvenience when glazing. The linear expansion of the material can be leveled by increasing the gaps between the frame and the glazing material.
 Sketch of a polycarbonate veranda
 Polycarbonate scratches easily, which can lead to rapid clouding. In addition, with prolonged exposure to ultraviolet radiation, the material may take on a yellowish tint. In order to prevent this phenomenon from occurring, a protective film is used, which, in addition to its main function, additionally strengthens the polycarbonate.
DIY veranda made of wood: environmentally friendly and beautiful
 Veranda made of wood: simple and environmentally friendly
 The most common material is wood. With the presence of new materials on the building materials market and innovative construction technologies, the leading position of this material remains unchanged.
When constructing a veranda, the choice of construction method is quite wide. It can be made of frame-panel, timber or log. The last option is suitable for a house built in the form of a log house. For constructing a building with your own hands, a frame-panel veranda is most suitable due to its simplicity and cost.
A wooden extension is lightweight, safe for the environment and people, and will also have a relatively low cost.
It should be understood that wood is quite a fire hazardous material. In addition, it requires special treatment to protect it from the effects of biological factors.
DIY brick veranda. Popular material
 Brick veranda
 Constructing a brick veranda has a number of advantages. On hot days, this room remains cool. The material does not require special care, has a long service life and is fireproof. The brick structure has exceptional reliability and strength.
If such a room is additionally insulated and double glazed, then, if there is heating in it, you can pleasantly spend time on the veranda at any time of the year.
Due to the fact that the brick structure has a significant mass, it is imperative to organize a reinforced foundation.
How to build a veranda - step-by-step instructions for the craftsman
Foundation
 The foundation of the veranda is an important matter
 If the foundation has not been laid, it should be built in accordance with the selected type. As a rule, a strip or column type foundation is constructed. If the area of the planned construction is swampy, then the use of piles is necessary. In order to select it correctly, the combination of the following factors should be adequately assessed: the material used, the type of foundation of the main structure, the characteristics of the soil and its slope.
The strip foundation is made of concrete, blocks, brick, stone. For its installation, a cushion of sand or gravel is provided. In most cases, it is not connected to the house and is erected as a separate building.
For lightweight structures, a columnar type foundation is constructed. These include structures made of wood or polycarbonate. Brick or reinforced concrete pillars are installed on a sand bed. They are waterproofed, after which the joists and floors are laid.
 Columnar foundation
 Frame
As a frame for the structure, you will need a beam with a cross-section of about 100x100 mm or logs of the appropriate size. The lower belt of the harness must be made of dense wood, preferably oak.
 Veranda frame
 Connections in the corners of the structure are made in half a tree. The bottom trim must be made with a double layer of material. Lags are inserted into it to organize the floor. The racks are fastened using spikes to the lower belt of the strapping with fixation with nails and staples. It is possible to replace beams made of solid material with prefabricated racks made of boards. The strapping of the upper chord is fixed to the racks and later the rafters are mounted on them. Fastening occurs in the same way - using spikes and nails.
A horizontal beam is fixed to the wall of the main building. It, as well as the racks that are adjacent to the wall, are strengthened with anchors.
It is important that the roofs of the veranda and the house meet, with the latter going under the roof of the main building.
Roof
The roof of the veranda is made of a pitched roof with a greater slope compared to the roof of the house. It is desirable that the roofing material of the veranda and the house be the same. This optional requirement is due to aesthetic considerations. The choice of roofing material is not a fundamental issue.
It should be understood that the use of a metal profile sheet will require sound insulation measures.
The construction of the roof begins with the installation of the sheathing. For this purpose, unedged boards are used, laid in a horizontal plane at certain intervals. Roofing material is placed on the sheathing. The small slope of the veranda roof makes it necessary to lay it with a slightly larger overlap than is usually done. Experts recommend organizing waterproofing using roofing felt.
Floor
The boards that will make up the floor are laid on logs that were previously prepared. The boards must be at least 40 mm thick. Before starting work, the material is treated with antiseptic. Upon completion of installation, the boards are painted.
To circulate air masses, ventilation holes are installed in the underground.
Window installation
The veranda has windows that are larger than those in the main building. This is due to the fact that the room is intended to be used in the warm season, when the sunlight is sufficient to illuminate the room. The location of the window sill board should be at a distance of about 500 mm from the floor.
Most often, windows have single glazing. The frames can be mounted on racks, which will result in a showcase type of glazing. The gaps are eliminated using construction foam, which is then covered with platbands.
Walls
The choice of wall material depends on the preferences of the home owners and the requirements described above for the design of the veranda.
The easiest option for do-it-yourself installation is to use tongue-and-groove boards, which are connected to each other in the same way as lining and attached to the racks.
DIY veranda: construction video
In the proposed videos you can see the process of constructing a veranda.
Veranda: photos of interesting solutions
The veranda is the decoration of the site. Look at photos of different porches for inspiration.
 Veranda with sliding wall
  Veranda with stairs
  Veranda with curtains
A country holiday at the dacha is, first of all, an opportunity to breathe the fresh air of a garden or forest twenty hours a day. It is impossible to relax and at the same time be in the stuffy box of a country house, so a summer resident who values his health sooner or later arranges with his own hands a full-fledged summer terrace with an awning or a roof. Building a terrace with your own hands is much simpler than a gazebo or veranda, so arranging a special area for a table and garden furniture, as a rule, does not require large investments, although the effect will be quite impressive.
What is the secret of the terrace
Despite a certain external similarity between the veranda and the terrace, the purpose of these buildings is different, as are the actual sizes and designs. A veranda is a part of a house with closed walls, windows and a full roof. The terrace is a landscaped outdoor area for relaxing on a sunny day with a canopy, canopy or awning. It’s easier to understand the difference if you look at photos or drawings of a classic terrace.

When choosing a place and method for building a terrace with your own hands, you can use classic techniques for arranging a recreation area:
- In close proximity to the house, using the platform and steps as a porch and platform in front of the entrance to the house;
- Take it out as a separate area and place it in a cozy, sunny and less windy place in the summer cottage. In this case, a prerequisite is the arrangement of a path, stairs or steps, with the help of which you can quickly get inside the house;
- Build a special type of roof or ceiling for a country house with your own hands, on which the recreation area will be located.
Important! It is clear that verandas and gazebos are not built this way, so any drawings and recommendations for the construction of terraces can be creatively processed, changing the dimensions to suit your wishes. The main thing is that the design is comfortable, durable and safe to use.
The dimensions of terraced areas, as a rule, can be several times larger than the dimensions of gazebo buildings, and even more so, verandas. Almost always, the base of the deck is built from wood or composite, raising the structure above the ground so that moisture and dampness do not affect the condition of the boardwalk.

Selecting the device, design and dimensions
The terrace is a one-of-a-kind building, designed not to create shade, but, on the contrary, aimed at providing the possibility of a comfortable and safe stay in the sun. Therefore, when choosing a project and site for constructing a terrace with your own hands, drawings and dimensions, you must take into account the following features:
- The design of a platform of any size, raised above the ground by more than 18-20 cm, must include fencing and railings for the terrace. For buildings that include several platforms located at different heights, intermediate steps and handrails are provided;
- The floor, railings and fences must be made of wood or a material with similar properties, for example, a polymer composite. The drawing must indicate the quality of wood processing and the type of coating applied - varnish or a protective composition based on epoxy resins;
- If there is a canopy or awning, one edge of the roof must be attached to the main wall of the house, the second rests on stationary supports embedded in the ground to a depth of at least 40 cm with a concrete blind area poured.
Important! Before choosing a diagram of how to make a terrace, it is important to choose the right material that best matches the design in the drawing.
The easiest way is to build a terrace at the corner junction of two walls of the house, as in the photo. In this case, we build a terrace and automatically get a platform in front of the entrance to the house.
Corner terrace design
The simplest option for a terrace would be to build a platform made of wood on a primitive foundation of concrete blocks or slabs, as in the drawing. The angular arrangement provides protection of the terrace area from wind and rain on both sides, so there is no need to install wind protection with polycarbonate sheets or wood panels.
If necessary, you can install a fabric awning, curtain or canopy over the terrace, the dimensions of which will be limited only by the dimensions of the walls of the house. The disadvantages of the design include the fact that if the slope is incorrect, the wooden platform can affect the distribution of rainwater, therefore the calculation and size of the slope of 3-4 degrees must be immediately recorded on the terrace drawing. The size of the foundation supports for the flooring must be calculated from a sketch or drawing, based on measurements of the entrance opening above the ground level.

For a lightweight frame structure of a terraced area, it will be enough to lay 12-15 concrete blocks or several dozen clinker tiles as a foundation. You will first need to remove the top layer of soil, fill it with fine gravel, compact it and lay a sand cushion. The most difficult thing will be to maintain the size and thickness of the sand base so that the height of the foundation columnar or slab supports does not exceed the calculated value according to the drawing.
Geotextiles can be laid on the sand, which effectively prevents the growth of weeds and grass. To fill the floor of the terrace, experts recommend first tying the supports with timber and laying joists made of wood. But in this case, you have to increase the vertical size of the terrace in height by 20-30 cm, which is not always convenient. In the simplest case, a beam measuring 60x60 mm is laid directly on the tile and fixed with pieces of reinforcement, driving it directly into the ground.
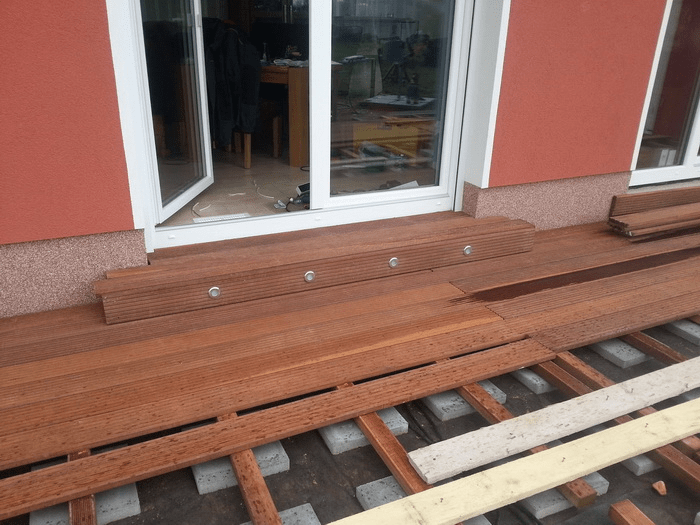
The most difficult stage of assembling a budget terrace structure will be covering the decking with boards. An oak or special decking board made of polypropylene and sawdust, 200x30 mm in size, is best suited.
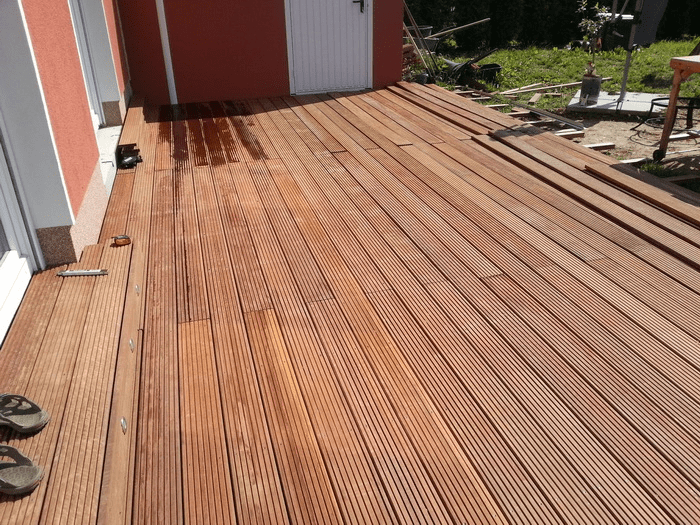
For your information! The appearance and dimensions of the composite material are practically no different from processed natural boards. High resistance to moisture and absolute insensitivity to insects and pathogenic microorganisms make decking an excellent substitute for expensive oak wood.
When covering the platform frame, you must carefully follow the recommendations for installing decking boards given in the drawing. In a similar way, flooring can be made from ordinary boards pre-treated with an antiseptic.
Building a simple terrace on your own
The average size of the site is 4x2 m. We will install the wooden structure on wooden supports in a swinging pattern. Part of the terrace area will rest on pillars made of paired timber 120 cm long and 100x100 mm in size, the second part of the terrace will rest on the plank wall of the country house. To install the timber, we will drill holes in the ground with a diameter of 90 mm and hammer the supports with a sledgehammer.

Next, the supports driven into the ground must be tied with a flat board or a sheet of thick plywood with a section size of 350x40 mm. When attaching boards, it is necessary to additionally control the horizontal position of the strapping sheet.

We attach the side trim boards directly to the walls of the wooden house; in the supports, you will need to cut down for installation of the longitudinal trim board.
After assembling the frame, transverse joists are installed, measuring 2.5 m with a cross-section of 100x40 mm, which will increase the rigidity of the base of the terrace platform and at the same time serve as a support for the floorboards.

At the next stage, the terrace fencing is assembled. Along the outer contour of the platform, grooves are cut out in the floorboards, after which, as in the drawing, supports are nailed under the railings. A vertical beam or board measuring 100x50 mm, 120 cm high is attached to the bottom board of the trim using self-tapping screws. A groove for the crossbars is filed on the inside of the racks, after which the lower bar and railings for the terrace area are installed.
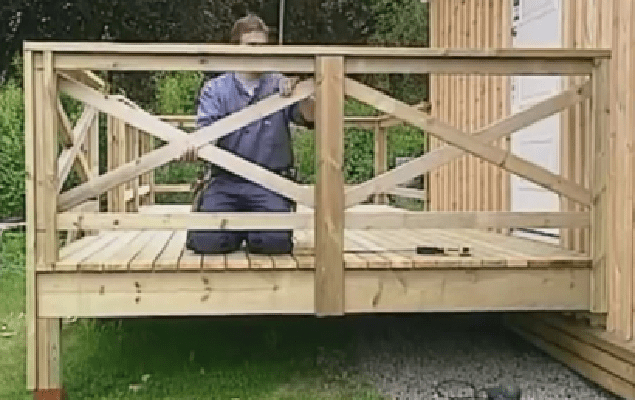
Diagonal spacers are placed between the posts, increasing the strength of the entire fence structure.
Conclusion
The above terrace design is simple and easy to build with your own hands. If desired, you can install a small fabric awning or a full-fledged canopy made of polycarbonate or light ondulin over the terrace area. The wooden structure must be treated with protective antiseptics, and the floor must be periodically treated with wax or paraffin mastics.
Many owners of private houses and summer cottages are thinking about building a veranda. This room, filled with comfort and warmth, is an excellent place for receiving guests and relaxing. We will talk further about the features of constructing a veranda attached to a wooden house.
Veranda for a wooden house: features, advantages, varieties
The construction of a veranda attached to the house allows you to get a room with an amazing view of nature. Among the advantages of the veranda, it should be noted:
- the possibility of obtaining a relaxation room that is filled with light and warmth;
- the possibility of expanding the usable area of the house;
- excellent decoration of the façade of the building;
- use of the room as a dining or living room.
In relation to the design features of the veranda there are:
- extensions;
- detached verandas.
Wooden verandas attached to the house photo:

The first option is more popular, since to visit such a veranda you do not need to go outside first, but just get into it through the house. In addition, depending on the shape, verandas can be rectangular, square, or semicircular. Sometimes there are modern verandas in the form of a hexagon or polyhedron.
Depending on the purpose, verandas are divided into open and closed. The first option is relevant when the veranda will be used only in the summer. Closed verandas can be summer - unheated and winter - which can be used all year round.
If you plan to build an open veranda, then the walls can be shrubs and trees, and to make the roof it is enough to use polycarbonate. If you plan to build a veranda, which is located near a wooden house, then we recommend using wood to make it. In this way, it will be possible to achieve harmony between the veranda and the main building.

How to properly build a veranda for a wooden house: construction technology
Work on the construction of a veranda should begin by choosing a place for its construction and by creating a project for the future building. If you plan to build a veranda attached to the house (this option is the most common), then, therefore, at the beginning, you need to decide on the area of the house to which the veranda will be attached.
We also recommend setting up a veranda on the south side, then, even in winter, it will be naturally heated by sunlight. The standard option is to build a veranda in front of the front door, so it will serve as a so-called terrace - a place to meet guests and relax together with them.

Also, when choosing a place for a veranda, you should pay attention to the landscapes that will be visible from its window. Try to avoid that the veranda will abut against a neighboring building, fence or outbuildings. It is preferable if a garden or flower garden is visible from it.
The next stage of planning a veranda for a wooden house will be the choice of its design. There are several ways to plan a veranda:
- independent drawing up of drawings;
- individual selection of the project by experienced specialists;
- search for ready-made projects.

The first option is the most budget-friendly, but requires a lot of time and some experience in the construction industry. In order to find a ready-made project, you should also spend time. In addition, it is impossible to use the same building design for different houses, since each site has its own individual characteristics. Therefore, it is easiest and most reliable to turn to specialists. They will help not only plan the veranda in relation to your desires, but also calculate the amount of material needed for its construction, the depth of the foundation and other subtleties.
It is preferable if the appearance of the veranda has the same finish as the main building. In this way, it will be possible to achieve a certain harmony and attractiveness in the exterior.
Next, you should contact certain services in which the veranda project will be properly legalized. This action is not necessary for all private houses; the need to perform it should be checked with housing services. Please note that in some situations, it will take more than one month to obtain permission for construction work, so everything must be planned in advance.
After this, there follows the process of purchasing materials for the work and directly constructing a veranda for a wooden house with your own hands or with the involvement of specialists.

How to build a veranda for a wooden house
The initial stage of construction work involves preparing the site for the veranda. To do this, you need to level the base on which the extension will be built, clear it of debris and mark it for making the foundation.
The depth of the foundation that is being built under the veranda must be exactly the same as the foundation of the main building. Only in this way will it be possible to ensure their integrity and harmony during operation. It is not recommended to link two buildings into one single building. Since the load from the veranda is much less than from the house. Therefore, the foundation and the degree of its shrinkage will be different for them. It is necessary to provide a small gap between the foundation of the building and the veranda, literally 5 cm. The option of constructing both a strip and columnar foundation is possible.

The choice of one option or another depends on many factors, including the type of soil, the size of the building, etc. If the soil on the site is heaving, then it is better to give preference to a columnar type foundation. If there are a large number of clay and sandy inclusions in the soil, then you can choose a strip one. We recommend focusing on the type of foundation that was built for the main building and doing the same for the veranda.
In order to build a frame-type veranda or a wooden building, it is not necessary to pour a strip foundation, since it is more suitable for buildings with a large weight. An excellent option for a wooden veranda would be a columnar foundation. We recommend using brickwork and corner posts as a pillar.
First you need to dig holes where the masonry will be done. Their minimum depth is about 100 cm. Please note that if the size of the veranda is small, then it is enough to install only four corner pillars, otherwise the number of pillars should be increased.

Instructions for building a veranda of wooden houses, and in particular for equipping a columnar foundation with your own hands:
- make holes for the posts, their minimum depth is 100 cm;
- first, arrange a sand cushion in each of the holes; to do this, pour sand up to 15 cm thick into it, tamp it down well;
- then make the same layer of crushed stone;
- make a concrete solution and pour it into the holes in a layer of 15 cm;
- wait until the concrete sets, then you should lay out brick columns, their height should be 300 mm less than the finished floor;
- to waterproof the foundation, each pillar is covered with bitumen mastic;
- To remove gaps between the pillars and the ground surface, we recommend filling the base with sand.

How to attach a veranda to a wooden house with your own hands
The construction of the veranda should begin from the walls. If wood is still used to build the veranda, then first of all you should complete its lower frame. The bars are connected using a straight lock. After laying the second row, the cutting of joists and vertical posts begins, ensuring the rigidity of the structure. The entire structure is connected into a single wall using nails or staples.
Please note that the load-bearing vertical posts are located at intervals of half a meter. This distance is the most optimal to ensure structural strength. The racks are also used to install the rafter system and the top roof trim.
There are two types of structures that are used as racks:
- whole beams;
- connecting two boards together.
In order to fix the rafters, it is recommended to use beams; to fix it with the rack, anchor bolts are used. Please note that the roof of the veranda must fit well with the wall or roof of the main building, otherwise there is a risk of moisture getting into the veranda during rains.
The next stage is the arrangement of the floor. The best option is the construction of a wooden floor. However, if the veranda will be used in the winter season, then the floor should also be properly insulated and waterproofed.
Instructions for arranging a wooden floor in the veranda:
- a layer of insulation should be installed between the ground and the boards, which will ensure proper thermal insulation;
- the best option is backfilling with bulk materials such as expanded clay;
- then the foundation part of the building is covered with roofing felt, at least in two layers;
- the next stage involves fixing the logs to the surface and laying the boards.

Further finishing of the floor is carried out in accordance with the individual needs of the owners.
Advice: All wooden parts of the veranda must be pre-treated with antiseptics, which will protect them from the harmful effects of the environment and make the veranda more durable in use.
To build a veranda of wooden houses, you should first of all take care of constructing the frame. To do this, install the beams and connect them together using a straight lock. Next, the racks are installed and the top trim is made using timber. After which a rafter system is installed and, if necessary, veranda walls are constructed. Do not forget that the veranda is a very bright room with many windows. It is possible to install French windows that occupy the entire length of the wall. Choosing what to cover the roof with. Focus on the finishing material of the roof of the house itself. However, some fans of extraordinary solutions cover the roof with transparent finishing materials, thus allowing the sun to fully enter the room.
Installation of the rafter system during the process of extending the veranda of a wooden house is carried out in relation to the top trim or racks. To fix the roofing material on the roof, it is recommended to use wooden lathing. The pitch of laying the boards is determined in relation to the type of materials for finishing the roof. If the veranda will serve as a living space that is heated in winter, we recommend that you carry out a number of works aimed at hydro- and thermal insulation of the roof.
If rolled materials are used to finish the roof, then the sheathing must be continuous. When attaching the flooring to the surface, try to completely recess the nail heads. Nails are also used to secure the rolled material, and to provide additional fixation, we recommend using slats. When choosing the type of roof, you should give preference to a pitched or inclined structure. Thus, the problem of snow or rain accumulation will not bother you.

After making the floor, walls and roof, the stage of installing windows and doors in the veranda follows. First, the installation of window sill boards is carried out, fixing them at a distance of about half a meter from the floor. It is possible to install continuous glazing.
The window sill boards are fixed to the support post of the frame structure. To finish the gap between the window and the floor surface, use clapboard, wood or other alternative materials. If the veranda will be summer, then do only the exterior finishing. Otherwise, before carrying out interior decoration, the walls should be insulated. The ideal option is polystyrene foam or mineral wool. The place where the front door will be located is selected in relation to the personal preferences of the owners of the veranda. Its type and shape depends on the design of the house itself and the veranda attached to it. When we attach a veranda to a wooden house, we should carefully consider all the smallest details and, first of all, describe them in the construction design.
The opportunity to be at home and outdoors at the same time, to enjoy the surrounding nature and not get wet in the rain, to sunbathe and barbecue, to set up a winter garden, to relax with the whole family - all these desires become possible thanks to the ancient invention of architects, which is still popular today. Even to a finished house, you can add a terrace with your own hands without spending significant money.
What is a terrace, its types
An area near the house or in the garden, equipped for comfortable relaxation, usually adjacent to one of the walls of the house, traditionally raised above ground level, with decking and a canopy - this is the standard definition of a terrace. In fact, there are many types of terraces. To choose the appropriate option for your site, you should understand the differences and subtleties of the different types of these sites.
Type
The division into main groups is made according to design features and degree of openness, as well as location on the site. The choice of site type is influenced by the purpose and surrounding natural conditions, for example, strong winds or the presence of a reservoir.
Open
For mild climates and if you want to relax in the fresh air, an outdoor terrace is perfect. It is made without walls and roof, which allows you to enjoy the proximity of nature. For privacy, you can place tall plants or decorative elements on such an area, make a glass fence, and install balusters and railings.
Sun rays and precipitation will fall on furniture and other interior elements, so it is better to choose sofas and armchairs from a material that is not damaged by water and does not fade.
It is better to put interior items in the house for the winter
Half-open
Today is a sunny day and I want an open area, but in the evening it will rain and get colder. In this case, a good solution would be a compromise between a veranda protected on all sides and a terrace open to the sun and fresh air. Semi-open options come without a roof, but surrounded by walls and with a canopy in combination with a different number of walls and partitions, columns.
The most advanced version of such a private recreation area is a structure with sliding glass or plastic walls and a canopy. When conditions change, you can close the doors and find yourself in a room completely protected from the weather.
If you want to isolate yourself from indiscreet glances, you can use curtains and drapes, place pots with indoor plants, hang flower pots, and plant a hedge around
Closed
If the weather conditions in the region are difficult and change frequently, then the optimal solution would be to build a closed terrace on which you can relax and enjoy the countryside landscape even in winter. This is an entire room with walls and a ceiling, a canopy or a roof, it can be heated and has a separate entrance from the street or from the house.
Winter gardens are often installed in a closed terrace, and to make the area more open in the summer, sliding frames and walls are installed
By location
The terrace can be located deep in the garden, near a pond or pool, or adjacent to the house. Depending on their location, recreation areas have their own design features and nuances of decor and lighting.
Ground
A beautiful garden area can be built directly on the ground by carrying out preparatory work to strengthen and level the base for the terrace. A light canopy will shade and create privacy, wicker furniture will provide comfort, and garden plants and flowers around will give aroma and fusion with nature.
To protect the terrace from the wind, you can install light partitions
Advantages of soil construction:
- ease and speed of construction;
- minimal financial costs;
- openness of space and closeness to nature.
Among the disadvantages are:
- exposure to bad weather, possibility of flooding;
- the need to treat materials with antiseptics;
- not recommended for unstable and difficult soils;
- You need a flat area.
Ground
These decks are slightly raised above the ground and are mounted on joists or a concrete base. The finishing material for flooring is traditionally decking board, which looks great and does not rot, has no splinters, is safe and pleasant to walk barefoot.
Advantages of ground-based sites:
- can be either open, closed or combined;
- low financial costs;
- the flooring protects from water and dust;
- Great possibilities for design and decoration;
- does not require fencing due to its low height.
There are also relative disadvantages:
- the need to arrange a foundation;
- wooden parts require special processing.
The terrace flooring should be 5 cm below the level of the threshold of the house so that melted snow and rain do not enter the room
Exalted
Such terraces are raised above ground level to a height of half a meter, have steps, fencing or walls, and partitions. This is the optimal solution for difficult terrain and sloping areas, houses with a high base and porch, and if you want to build a multi-level area for comfortable relaxation. The advantages of this terrace are:
- the possibility of useful use of space with a slope or height differences;
- possibility of constructing multi-stage complex structures.
Overhanging
If there is a natural reservoir, pool or pond next to the estate, then building an overhanging terrace would be a good solution. It is also recommended for difficult terrain and a large slope near the house. Overhanging structures are very popular in mountain resort areas and estates with beautiful views. Pros of an overhanging terrace:
- allows you to enjoy the proximity of water;
- the possibility of beneficial use of areas with complex terrain;
- stunning view, the site seems to be floating in the air.
The disadvantages of an overhanging structure are the complexity of construction and the significant cost of the estimate, the need for fencing for safe recreation
What can you build from?
Various materials are used for construction; the choice depends on the purpose and the presence of walls and roof. Heavy structural elements will require a stronger frame and a solid foundation. On the market you can find special weather-resistant and expensive materials for outdoor use, and if you have a limited budget, use cheap ones at hand.
Base and floor
For light open ground and ground galleries, it is enough to make a gravel-sand cushion. During its construction, gravel or crushed stone of medium fraction and sand are used, and geotextiles are laid between these layers. The geo-fabric will prevent sand from mixing with crushed stone and subsidence of the base, as well as strengthen and level the soil and prevent weeds from growing onto the terrace.
More substantial wooden platforms are traditionally built on a base of metal screw piles, concrete supports, screeds and a lower frame made of wooden beams and logs.
For closed massive structures with a roof, the following types of foundation are suitable:
- tape;
- pile;
- screw.
The strip and pile type is made from concrete grade M-300, sand, water and a plasticizer, which is liquid soap. Reinforcement is performed using a rod, metal mesh or available materials. When installing formwork, you will need boards and bars for supports, and installing piles involves using roofing felt with permanent formwork and waterproofing.
The screw foundation is mounted from steel piles with blades at the bottom
The floor of the dirt terrace is not laid at all, furniture is placed and people enjoy relaxing in good weather. You can lay out the site:
- paving slabs;
- tile stone;
- sprinkle with small sea pebbles of different colors.
A frame is mounted on top of any foundation and logs made of timber measuring 50x150 mm, aluminum profile or WPC for decking are laid.
It is recommended to finish the decking with decking boards, specially designed for the street. It looks neat and imitates natural wood of valuable and expensive varieties, has a rich palette of textures and shades, and provides ample opportunities for stylish design of a recreation area.
To fasten deck boards you need to use galvanized or steel nails
Advantages of this material:
- does not rot, does not fade, does not burn;
- does not deform under the influence of water and heat: does not warp or swell;
- service life is at least 30 years;
- absolutely environmentally friendly and safe, it’s pleasant to walk on it barefoot;
- affordable price, ease of installation;
- Can be washed and cleaned with detergents.
Regular floorboards are also used for flooring. Wood is inexpensive, this is its advantage, but there are also disadvantages:
- under the influence of moisture, fungus and mold form on it, insects appear, dark spots appear, then the wood is destroyed;
- the boards become deformed due to water, and dry out when exposed to dry air;
- fire hazard.
To make it last longer, you should treat the board with antiseptic impregnation and cover it with several layers of weather-resistant or yacht varnish, and also choose species that are resistant to outdoor conditions, for example, larch.
Clinker or ceramic tiles for outdoor work and natural stone look great on the terrace. It is advisable to choose unglazed and non-slip coating options. Stamped concrete is an innovative material consisting of monolithic concrete, printed with polyurethane molds to create various textures on its surface.
Stamped concrete imitates wood, stone, paving stones, ceramics
Frame
The frame is the basis for the roof and future walls of the closed terrace; it bears the main weight load, so for the strength of the frame, either a thick wooden beam or a metal profile is chosen. For lightweight platforms, metal-plastic structures can be used.
Treatment of wooden parts is carried out with fungicidal impregnation and varnish or paint for external use.
The standard size of timber for support posts is 100x100 mm or 150x150 mm; the species you should choose are larch or oak, conifers. Aspen, birch or beech are not suitable for building a frame, as they are quickly destroyed by water. The support posts are reinforced with braces, which reduce the load on the supports and give the structure additional rigidity and stability. For these works, timber with dimensions of 50x100 mm is taken.
Canopy
Often a lightweight canopy is installed on the terrace. It can be made of tarpaulin or other waterproof fabric, polycarbonate, wood, glass. The canopy can be mounted flat or with slopes, semicircular in shape, or complex configuration. When building massive verandas, you will need support posts 150x150 mm, a rafter system made of wood or metal and roll waterproofing, as well as roofing material.
Soft roofing requires a continuous sheathing; it is used for domed roofs and tents
Polycarbonate is suitable as a roofing material. It is light, transparent, tolerates low temperatures well, and can take a curved shape. Corrugated sheeting is inexpensive and easy to install.
Partitions
For semi-open and closed areas, it is necessary to install partitions and walls that will create privacy and protect from bad weather. Most often they are made of wood, they can be solid or carved, in the form of lattice or low. With the help of partitions, the site is zoned into several corners with different purposes, for example, a summer kitchen and dining area are separated from the recreation area.
Enclosed terraces look great with full-height glass walls, which are equipped with sliding mechanisms for opening on a fine day
How to make a terrace with your own hands
Building a terrace with your own hands will not take much time and is quite within the capabilities of even a novice master.
Drawings and projects
If the main building has already been built and the terrace was not included in the project initially, you can design it later by drawing a detailed plan indicating all dimensions and location on the site.
The owners of ready-made terraces post designs of their creations for public use on the Internet
If the terrace is attached to the house, then the length is taken as the length of the area adjacent to the house
The flooring area is determined by multiplying the length by the width. For example, for a terrace with dimensions of 3x4 m, the area will be 12 m². Marking and construction rules:
- Decking consumption for finishing should be increased by 15%, making provision for waste. We round 13.8 m² to 14 and get the consumption of decking boards or other finishing material.
- The consumption of fasteners per 1 m² will be 22 clips and 4 starting fasteners per 1 linear meter. m. Each fastener has a hole for a self-tapping screw. Thus, for 12 m² you need to take 240 clips and 24 starters, 264 screws.
- Along the perimeter of the finished flooring, the ends of the boards are covered with end tape or a corner. The perimeter is 14 m.
- For the base you will need 3 main beams of 3 m each, logs that are laid in increments of 35 cm, for 1 m² you will need to take 3 linear meters of logs. The standard log length from the manufacturer is 4 m. With an area of 12 m², you will need to buy 9 logs, 4 m long. In addition, you will need crushed stone, sand, and concrete supports.
- Concrete pillars are dug in or poured to a depth of 40 to 60 cm every 1.5 m. The size of the supports is 40x40 cm, 9 supports will be needed.
- The height of the terrace should be slightly less than the height of the first floor of the main building to allow for a slope under the canopy. If the height of the house is 3 m, the height of the terrace will be 2.5 m.
- We calculate the supporting posts of the frame using support blocks along the perimeter of the site, you will get 8 posts of 2.5 m each. 16 m of 50x100 mm timber will be used for braces on both sides of each post.
- A shed roof covers spans up to 4.5 m; for longer lengths, it is necessary to strengthen the structure with purlins and rafter legs. The pitch between rafters made from boards should be 60–120 cm, from timber 100–175 cm, from thick timber 150–200 cm. With a pitch of 80 cm, you will need 5 rafters of 3.5 m in length and dimensions of 50x200 mm, waterproofing 12 m² plus a margin for an overhanging canopy, a total of 14 m².
- For the sheathing you need boards 25x100 mm. Roofing material must be taken with a reserve for the canopy, which will be 14 m².
Wooden with canopy
The project has been selected, the drawing is available, and now construction work can begin. Let's take an example of all the stages of installing a wooden terrace with a canopy, one of the most affordable and popular options.
For construction, you should prepare the following tools and consumables:
- tape measure, level, pencil, ruler;
- shovel, hammer, hacksaw;
- sand, crushed stone, water;
- fasteners, screwdriver, drill with attachments;
- timber, waterproofing, roofing material, boards;
- decking and accessories for it;
- antiseptic impregnation, varnish or paint for exterior use.
Preparing the base and floor
Stages of preparatory work:
- The site is marked according to the diagram, the perimeter is outlined, and the locations of the support blocks are marked. The top fertile layer of soil is removed. Stones and debris are removed. Holes are dug for the support blocks, sand and crushed stone are poured onto the bottom.
The layer of crushed stone and sand in the pit should be 10 cm
- Ready-made supports are installed on the pillow; they should protrude 15 cm above the surface to ventilate the flooring. For waterproofing, they are coated with bitumen mortar and wrapped in roofing felt. You can make permanent formwork from roofing felt and pour concrete pillars. The support beam is mounted horizontally to the wall of the house 5 cm below the floor level.
The timber is secured with anchor bolts every 60 cm
- Beams are installed and fixed on the supports with reinforcement and fasteners, all junction points are waterproofed, logs are placed on top, attached to the support beam and beams, and the strapping is knocked down.
- A terrace or regular floorboard is laid and fastened across the joists.
The ends of the decking boards are covered with corners
- The floorboard is sanded and impregnated with stain and antiseptic, and varnished in several layers.
Construction of the frame

Canopy
For a wooden terrace attached to a house, the optimal solution would be a pitched roof with a slope of 5–10º. Installation includes the following steps:

Polycarbonate
Polycarbonate has flexibility, transparency and lightness, is available in various shades, and is durable. Thanks to these qualities, it is often used for the construction of terraces, where it is an excellent alternative to wood and metal.
Polycarbonate is easy and quick to install with your own hands
Required materials and tools
To work, the master will need:
- shovel, tape measure, level;
- crushed stone, sand, concrete M-300, water;
- wood or metal for the frame: profile pipe 80x80 for the main posts, 40x20 for the truss, embedded parts for the base;
- polycarbonate transparent or matte;
- welding machine;
- fasteners: bolts, nuts, hardware;
- drill, screwdriver, circular saw, construction knife.
Preparing the base and floor
For lightweight polycarbonate, a metal frame and a columnar base are sufficient. Installation is carried out as follows:

Construction of the frame
Stages of work:

Canopy and walls
If the terrace is planned to be open, then it is enough to make a fence to the desired height. For semi-open and closed recreation areas, walls, partitions and a canopy are installed. Work order:

Video: building a wooden terrace
Photo gallery: arrangement and decor of the terrace
It’s easy and inexpensive to expand the usable space and create a recreation area near your home with your own hands. The result is a comfortable outdoor living or dining area where the whole family will enjoy spending nice summer days.